
Buying parts for a project can be intimidating. Beyond just identifying what you need in the first place, you then have to navigate a maze of different suppliers. Who’s reputable? What do you avoid?
Boutique shops offering curated selections will probably have good quality components, but you’re going to pay more – and it might be hard to find in the first place. Rolling the dice with whatever you find on Amazon might be a more familiar search experience but you risk getting low quality, grey market, or counterfeit parts. The risk is even worse if you go with Aliexpress or similar! And the big, reputable parts houses which are used by professionals might be intimidating as they’re built for engineers working in the field.
With a little know-how, though, it’s actually pretty easy and you’ll get genuine, high quality components from the best suppliers, and you might even get a better price if you buy enough to get a volume discount which often starts as low as quantity 10 units.
In this guide, I’ll show you how to search for capacitors on Mouser, one of the leading parts suppliers, available worldwide. (I’ll cover searching for resistors, inductors, and some other things like searching for transistors and op-amps, in other posts and I’ll link those here when it’s ready. This is the first of the series.)
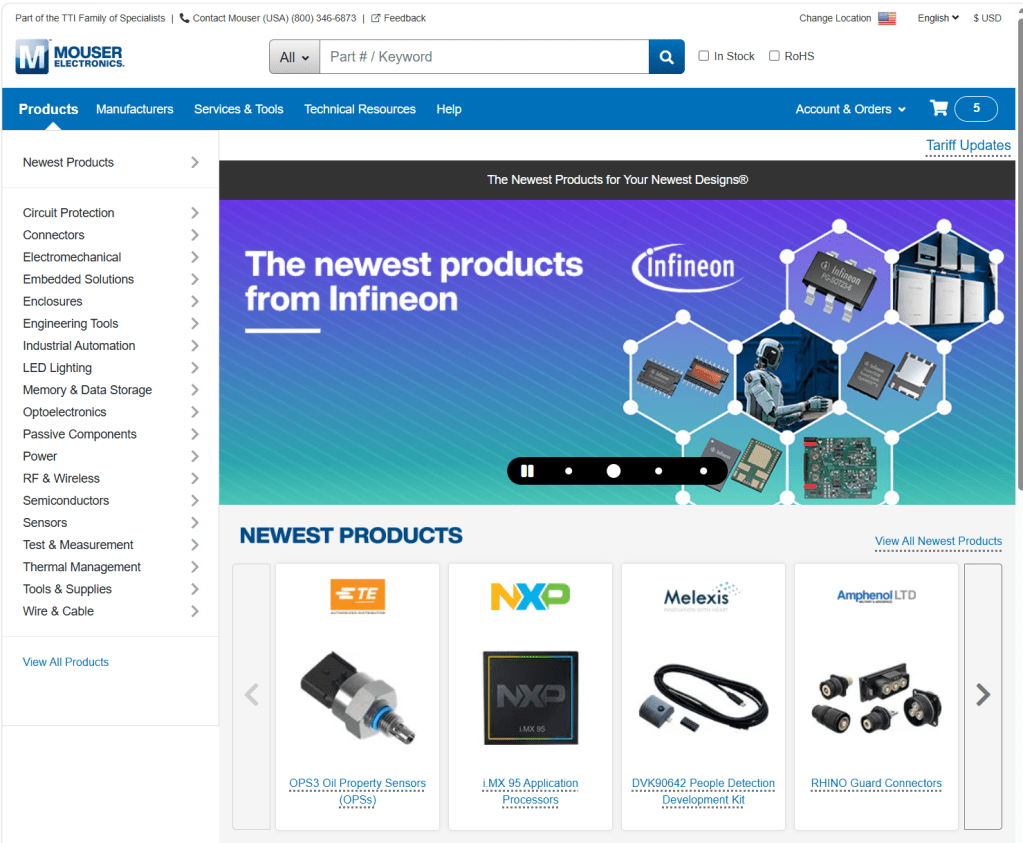
Table of Contents
- Table of Contents
- Why replace capacitors at all?
- Electrolytic Capacitor Basics
- Searching for Radial Aluminum Electrolytic Capacitors
- Screw Terminal Electrolytic Capacitors
- Snap-In Electrolytic Capacitors
- Film Capacitor Basics
- Searching for Film Capacitors
- Ceramic Capacitor Basics
- Searching for Ceramic Capacitors
- Speaker Crossover Capcaitors
- Conclusion
Why replace capacitors at all?
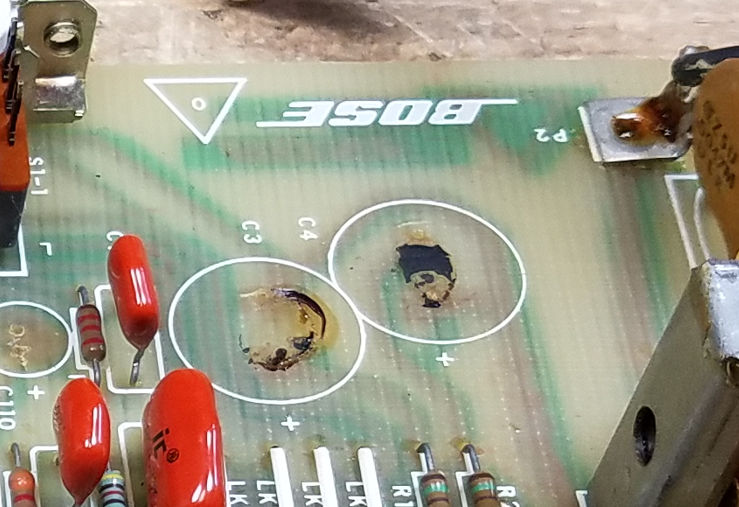
Many capacitors, especially aluminum electrolytics, have a finite lifespan. The electrolyte inside them slowly dries out over time, which causes capacitance to drop and ESR (series resistance) to rise. A capacitor with high ESR can no longer filter power supply noise effectively, which puts stress on other components downstream. It also generates internal heat, creating a vicious cycle which ultimately leads to component failure.
In audio equipment this shows up as hum, distortion, or loss of bass. In other gear it can cause erratic behavior, failure to start, or outright damage to other parts. Electrolytic capacitors in equipment from the older than the 2000s are often operating well past their design life, even if the device still powers on, and proactive replacement is usually cheaper and less frustrating than diagnosing the cascade of symptoms a failing cap can cause.
Electrolytic capacitors are probably the most common failure. Other types of capacitors can also fail but that’s usually either because they’re an archaic type (paper) or have been physically damaged.
In many repairs (but certainly not all), just replacing electrolytic capacitors is enough to bring a device back to life whether it’s an antique radio, a vintage stereo receiver, or a modern computer monitor.

Electrolytic Capacitor Basics
Since caps are probably the most common thing that’s needed, we’ll start here. You can jump directly to Mouser’s Capacitor search page. https://www.mouser.com/c/passive-components/capacitors/ There are a couple more clicks you cna use to drill down a bit from there before going for spec selection.

You’re likely going to see Aluminum electrolytic, ceramic, and film capacitors – and many more electrolytics than any of the others. These three types cover the vast majority of what you’ll encounter in consumer electronics, and they each have a distinct job. (If you’re working on more digital electronics, for some reason those tended to use tantalum electrolytic capacitors – you can replace those with an aluminum electrolytic you find using the instructions here as well.)
Aluminum electrolytics are the cylindrical cans you see everywhere, and they’re built around a liquid or gel electrolyte soaked into aluminum foil. They’re cheap to make at high capacitance values, which is why they dominate in power supply filtering and audio coupling stages, but the electrolyte can dry out or vent over time, which is why they’re the most common failure point you’re likely to encounter when repairing older gear.
Axial vs. Radial Lead Electrolytic Capacitors

The difference here is purely physical. An axial capacitor has one lead coming out each end, like a little barrel or torpedo, and they tend to show up in older equipment designed for hand-wiring or older PCB layouts where components lie flat. A radial capacitor has both leads coming out the same end and stands upright on the board, which is how most modern electrolytic capacitors are packaged. When you’re doing a replacement, you almost always want to match the footprint on the board. You can sometimes get away with replacing a radial lead cap with an axial lead capacitor by bending a lead around (although why you’d want to is another question, as axial lead caps are more expensive) but if you replace an axial lead cap with a radial lead by splaying the legs wide you’ll stress out the seals where the leads exit the case and it can lead to premature failure.
Snap-In and Screw Terminal Electrolytic Capacitors
Axial and Radial lead capacitors are typically solder-in, smaller lead sizes. If you’re working in the main power supply of something which has a fair amount of power output, like a 100W power amplifier, you’re going to find some bigger capacitors. In the Search screen, those would be the Snap-In or Screw Terminal capacitors.
These are both formats for large electrolytic capacitors that are too big to be held in place reliably by thin wire leads alone. Snap-in capacitors have extrapins spaced to fit into PCB holes that are soldered in but not connected to anything, providing extra mechanical support.
Screw terminal capacitors are even larger and are meant to be bolted to a chassis or bus bar and connected with wires or lugs, rather than mounted to a PCB at all. They’re common in industrial gear and high-powered audio equipment. If you’re replacing one of these, the pin spacing (for snap-in) is absolutely critical to match. Screw terminal spacing (for screw terminal caps) should be matched as closely as possible, but you genreally have a few mm of play in wire leads attached that way to adjust for slightly different manufacturing sizes.
Sometimes, in an older amplifier, you’ll see large cans clamped in but they use pins. I tend to replace these with screw terminal capacitors, and add extra ring terminals to the wire terminations. It’s easier to solder, and easier to service if it needs more work in another few decades. More than anything, though, that’s an aesthetic preference more than a functional one.
Polarized vs. Bi-Polar / Non-Polar Electrolytic Capacitors
Most aluminum electrolytic capacitors are polarized, meaning they have a positive and a negative terminal and must be installed the right way around or they’ll fail, sometimes dramatically.
Bi-polar (also called non-polarized electrolytic, or NP) caps are built so that either lead can go to either polarity, which makes them useful in applications where the voltage across the cap is AC or where the polarity is otherwise unpredictable. Bipolar caps turn up often in speaker crossovers, or interstage coupling.
You can always replace a polarized capacitor with a non-polarized capacitor (although an NP cap might be a little big larger physically) but if you replace an NP cap with a polarized one, there’s a good chance that it’ll fail and end up as a short circuit between places that shouldn’t be connected with a DC voltage.
One thing to note: if you are actually replacing crossover capacitors inside a speaker, I recommend shopping from a site that sells crossover components instead. There’s a couple of things to get wrong here, since crossover components are handling real current, not just voltage. At the very, very end of this article I have a short note that talks about this and where to go for parts; that’ll be the subject of a separate article in the future as well.
Brands
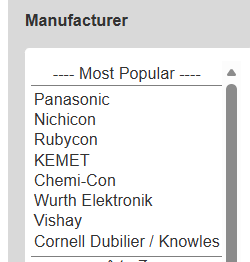
Mouser helpfully lists some of the most popular brands, and you’ll generally find what you need within any of these.
If you’re in doubt, Nichicon caps are always a good choice. They’re a Japanese brand, highly regarded and often used in audio equipment from the factory. For screw- and snap-in capacitors, you’ll probably find what you need in a KEMET, Panasonic, or Cornell Dubilier / Knowles capacitor.
More important than the brand is selecting the right specs for the application., which you’ll do through the interactive search form.
Searching for Radial Aluminum Electrolytic Capacitors
This all applies to Axial, if you click Axial instead of Radial on their web site. As you’re searching, make sure that “Smart Filtering” is checked, and I recommend selecting both “In Stock” and “Normally Stocked” below. These will ensure you’re seeing results you can buy, and that the display will update and narrow your choices as you move through the selections.
The same general idea applies to all the other types of capacitors as well, which I cover a bit later in this article, but in somewhat lesser detail since most of it is the same. Keep on reading to learn about Snap-In / Screw Terminal, as well as Ceramic and Film capacitors.
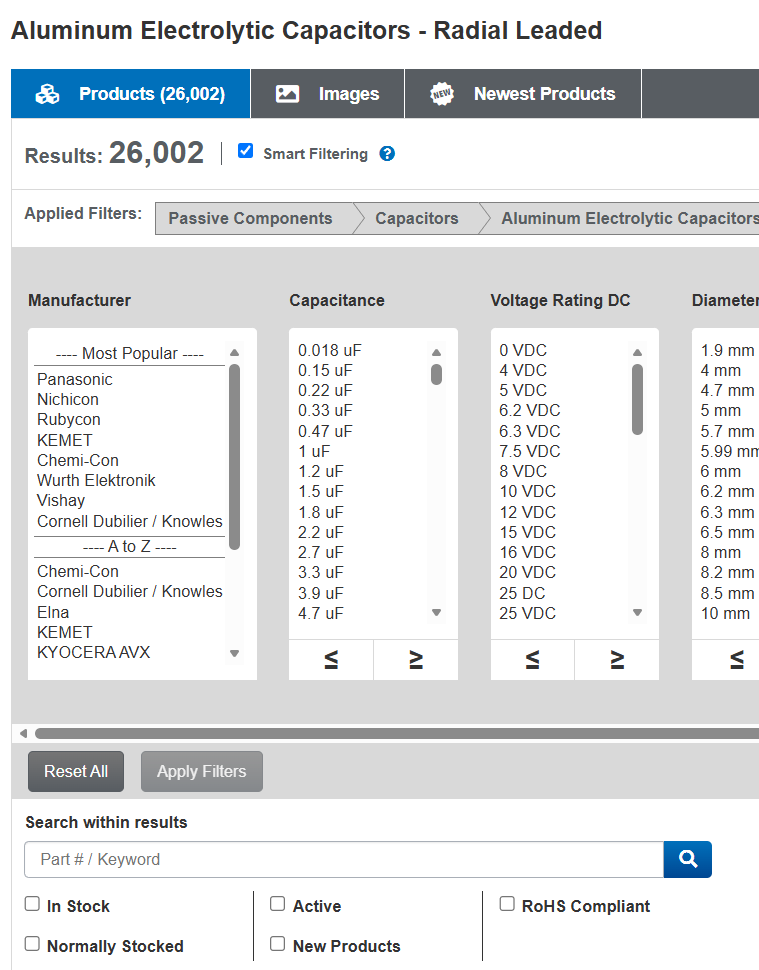
From (mostly) left-to-right:
Capacitance

The capacitor value is typically printed on the side, next to the voltage. In this case, we’re looking at a 2200 uF, 25V radial lead capacitor. When in doubt, pick the exact same capacitance as is listed on the part you’re planning to replace.
Older equipment was often built with capacitor values that followed older preferred-number series, so you’ll sometimes see values like 5 µF, 8 µF, or 25 µF on a schematic that don’t match anything currently in production. Modern capacitors are manufactured to the E-series, where the standard values near those are 4.7 µF, 10 µF, and 22 µF.
In almost all practical applications, a 4.7 µF cap is a correct replacement for a 5 µF cap, and a 22 µF works where 25 µF was specified. The tolerances on most capacitors are wide enough (often plus or minus 20%) that the circuits were never relying on the exact value anyway. If you’re ever unsure, the datasheet or schematic context will usually make clear whether the application is precision-critical (very rare) or just general use.
If you’re not sure yourself, here’s a chart that can help you pick the best modern replacement from an old value. The Series shows you which group it’s from — this is just for reference. “E6” means that series between 1 and 10 has 6 values, and with a 20% tolerance, this is enough to cover all possibilities. “E12” is a 10% tolerance, needing 12 different values to cover the range. “E24” is a 5% tolerance, and so on. (Resistors go higher, with E48 for 2%, E96 for 1%, or E192 for 0.5% — but electrolytic and film capacitors aren’t built to such tight tolerances.)
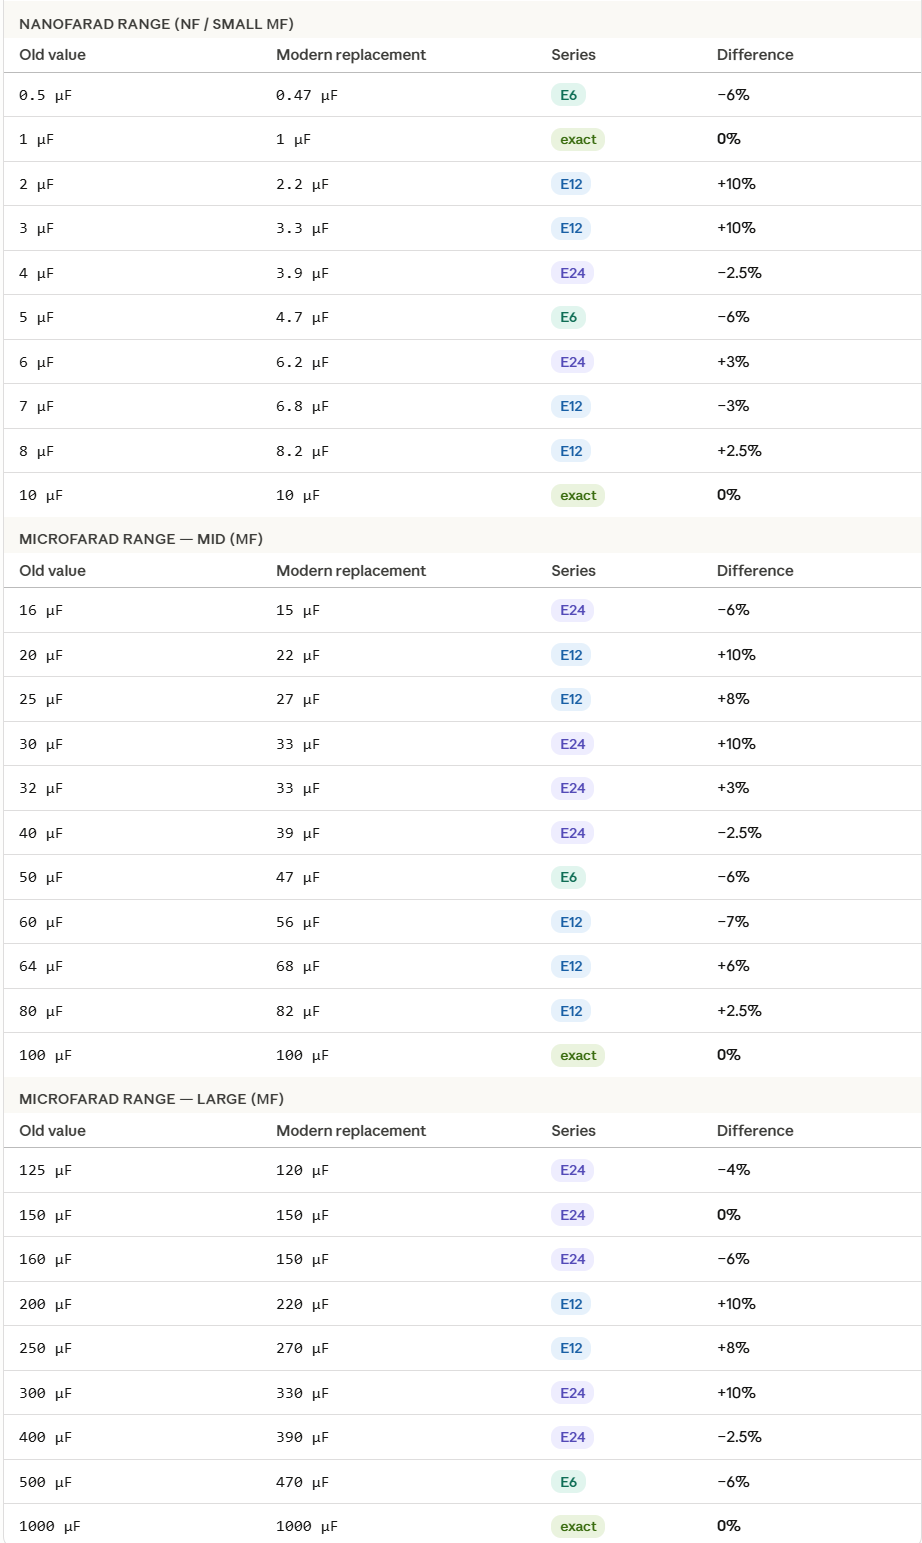
Electrolytic capacitor applications are typically pretty forgiving. Stay close to the original value and you’re fine.
Voltage
The voltage rating on a replacement cap must meet or exceed the original. Going lower risks premature failure or outright failure on startup. What’s less obvious is that going higher (within the same physical footprint) is actively good for longevity. A capacitor running at 50% of its rated voltage will outlast one running at 80-90% of its rated voltage by a significant margin, because the electric stress on the dielectric is lower.
Modern manufacturing has made higher-voltage caps in compact sizes more accessible, so it’s often possible to fit a 50V or 63V cap into a spot that originally held a 35V part, with no downside. Just verify the physical dimensions still fit before ordering.
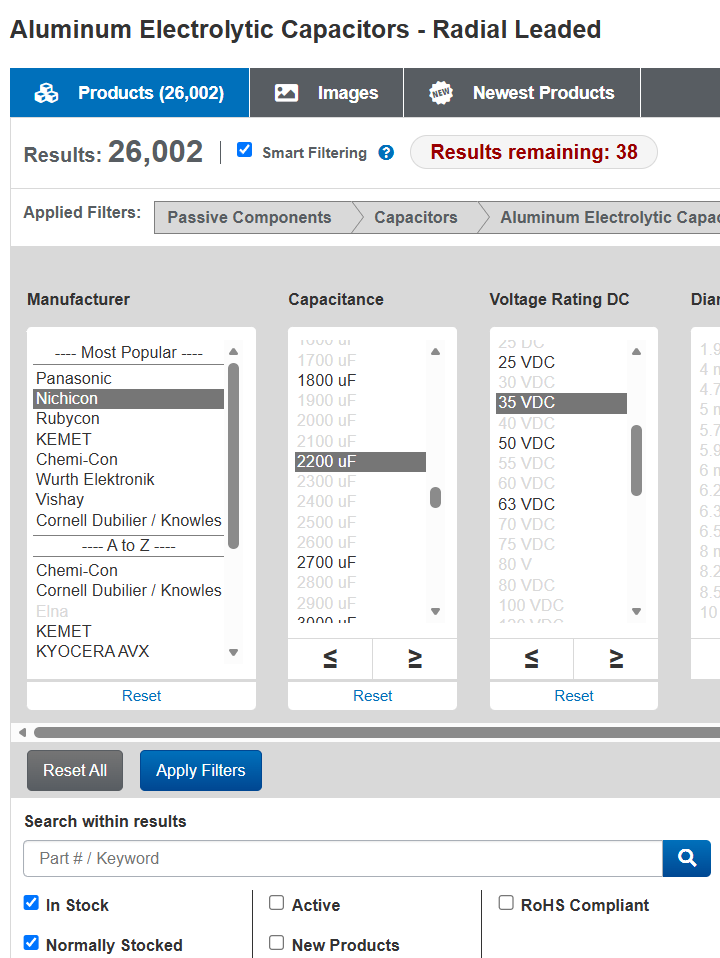
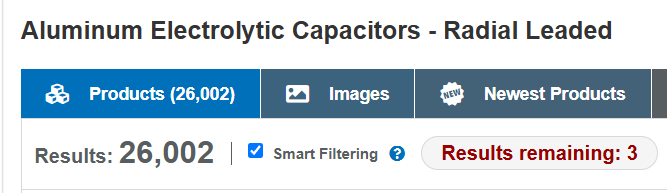
You can see how, just by selecting the brand, capacitance, and voltage (I’m going up to 35V in this example) we’ve narrowed it down from 11,023 in-stock options to just 38.
Diameter, Length, and Lead Spacing
These are obviously the physical dimensions of the capacitor. You can be a bit flexible with length and diameter: many modern replacements are going to be considerably smaller than whatever was there before, and the gap grows the older the original part. Your replacement might be smaller, but if you have the room for it, there’s no reason you can’t go a bit bigger as well. In most cases, you can leave the diameter and length blank and do a quick check before purchase that it’ll fit.
Lead spcaing is a bit more important. Perfect spacing between holes is great, but you can go 1-2mm in either direction without much issue. If you go smaller, you can slightly bend the legs apart; wider, slightly bend them together. If you do this, though, leave a gap at the base so you don’t end up doing a tight pinch where the leads exit the case – this can damage the seals and lead to premature failure. (A coin’s height or two is just fine here.)
Life & Temperature
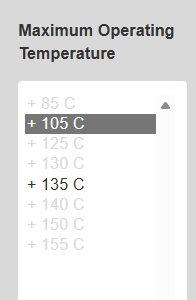
The design lifetime for capacitors – ranging from 1000 hours to tens of thousands – represents the mean time before failure of a capacitor run at 100% of its rated voltage and temperature. Your actual working lifespam will be greater if you’re running them de-rated in either direction. Going up a size or two in voltage, and selecting 105°C temperature rating, will potentially extend the lifespan by an order of magnitude or even more.
As such, I typically don’t select a value for Life, but I do pick one for temperature. Then when I get to the final set of selections, I’ll confirm that I have something reasonable but otherwise don’t worry about it too much.
Product
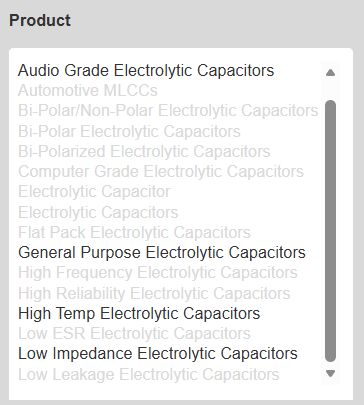
These designations are partly meaningful and partly marketing. Unless otherwise specified, you’re probably fine with “General Purpose Electrolytic Capacitors”, but you can occasionally get better performance (especially in audio and RF circuits) by selecting “Audio Grade” or “Low Impedance” electrolytic capacitors, respectively.
“Computer grade” typically means the capacitor is rated for higher ripple current and has a longer specified lifespan (often 2000 hours or more at rated temperature), reflecting the demands of server power supplies and PC motherboards that run continuously.
“Audio grade” is squishier and varies by manufacturer, but it generally implies tighter tolerances, lower ESR (equivalent series resistance), and sometimes specific construction choices that the manufacturer claims reduce distortion or noise in audio circuits. Whether the latter makes an audible difference is a subject of genuine argument, but the lower ESR and higher quality control can have real engineering benefits.
When you’re doing a straight repair, a reputable standard-grade cap from a known manufacturer (Nichicon, Panasonic, Rubycon, etc.) is usually all you need. Spending extra on audio-grade parts makes the most sense when you’re restoring something where the signal path capacitors are directly in the audio chain, or something especially high-end, but in most pieces of vintage gear you’d struggle measure with test equipment – let alone hear – any actual difference given the construction quality is so much higher today.
So, I’ve selected:
- Nichicon
- 2200 uF
- 35VDC
- (Diameter, Length, and Lead Spacing all blank)
- General Purpose
- (everything blank up to Temperature)
- 105C
That’s much more manageable! Hit “Apply Filters” to update the listing below.
Packaging
Now, we’ve got just 3 options.
| Price | Length | Lead Spacing | Life | Ripple | Temp | Packaging |
| $2.41 | 20mm | 7.5mm | 5000 H | 2.64 A | 105°C | Bulk |
| $2.03 | 20mm | 7.5mm | 2000 H | — | 105°C | Ammo |
| $1.85 | 25mm | 7.5mm | 1000 H | 1.26 A | 105°C | Ammo |
“Bulk” means they’ll arrive in a bag, loose. “Ammo Pack” refers to them coming folded in a small box if you buy a full Reel, where they come with the leads taped onto a perforated paper strip at even intervals suitable for a manufacturing robot on an assembly line.
They’re all about the same size. I generally prefer to get the ones with the highest Ripple capacity – which also relates to lifespan – just to be entirely sure I’ll never be in there again. But if you know the capacitor is only filtering power for a few smaller transistors, or is only in the signal path, you can go with a lower figure that’s cheaper. (Recall, running these de-rated drastically extends the lifespan. The “1000 hour” capacitor, upsized to the next voltage level and running at 65C instead of 105C, might easily last for up to 50,000 hours of normal operation.
The “Availability” column on the page tells you whether they’re in stock, and how many.
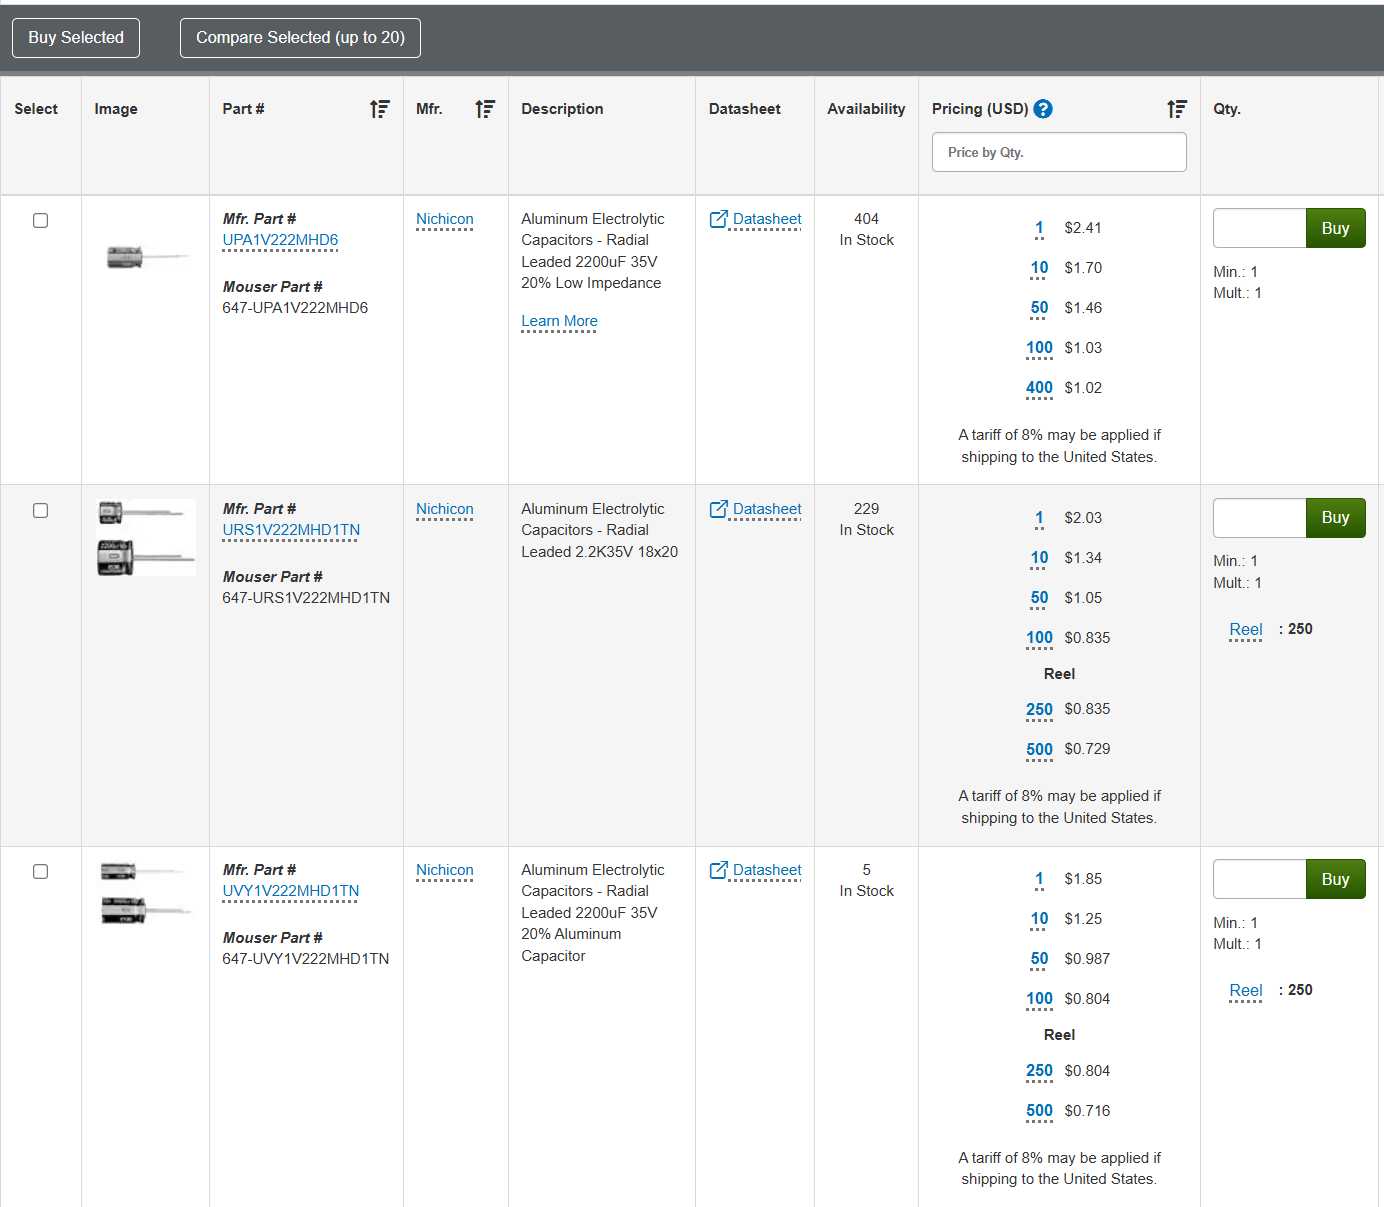
Click on the hyperlinked Part Number in the left column to go to the detail page.
You’ve got the pricing breakdown here:

And you’ve got the full specs:

If you especially wanted, you could view the full datasheet as well. Go ahead and enter your desired quantity, it’ll tell you the price, and then hit “Buy” to add to cart.

It’s a good idea to pick up a few extra in case you damgae one or need an extra, especially if you’re close to a price break. For example, ordering 3 more capacitors:

The price you pay for 3 more capacitors, including tariff, only ends up being 14 cents more. It’s worth the peace of mind – and the single shipping price.
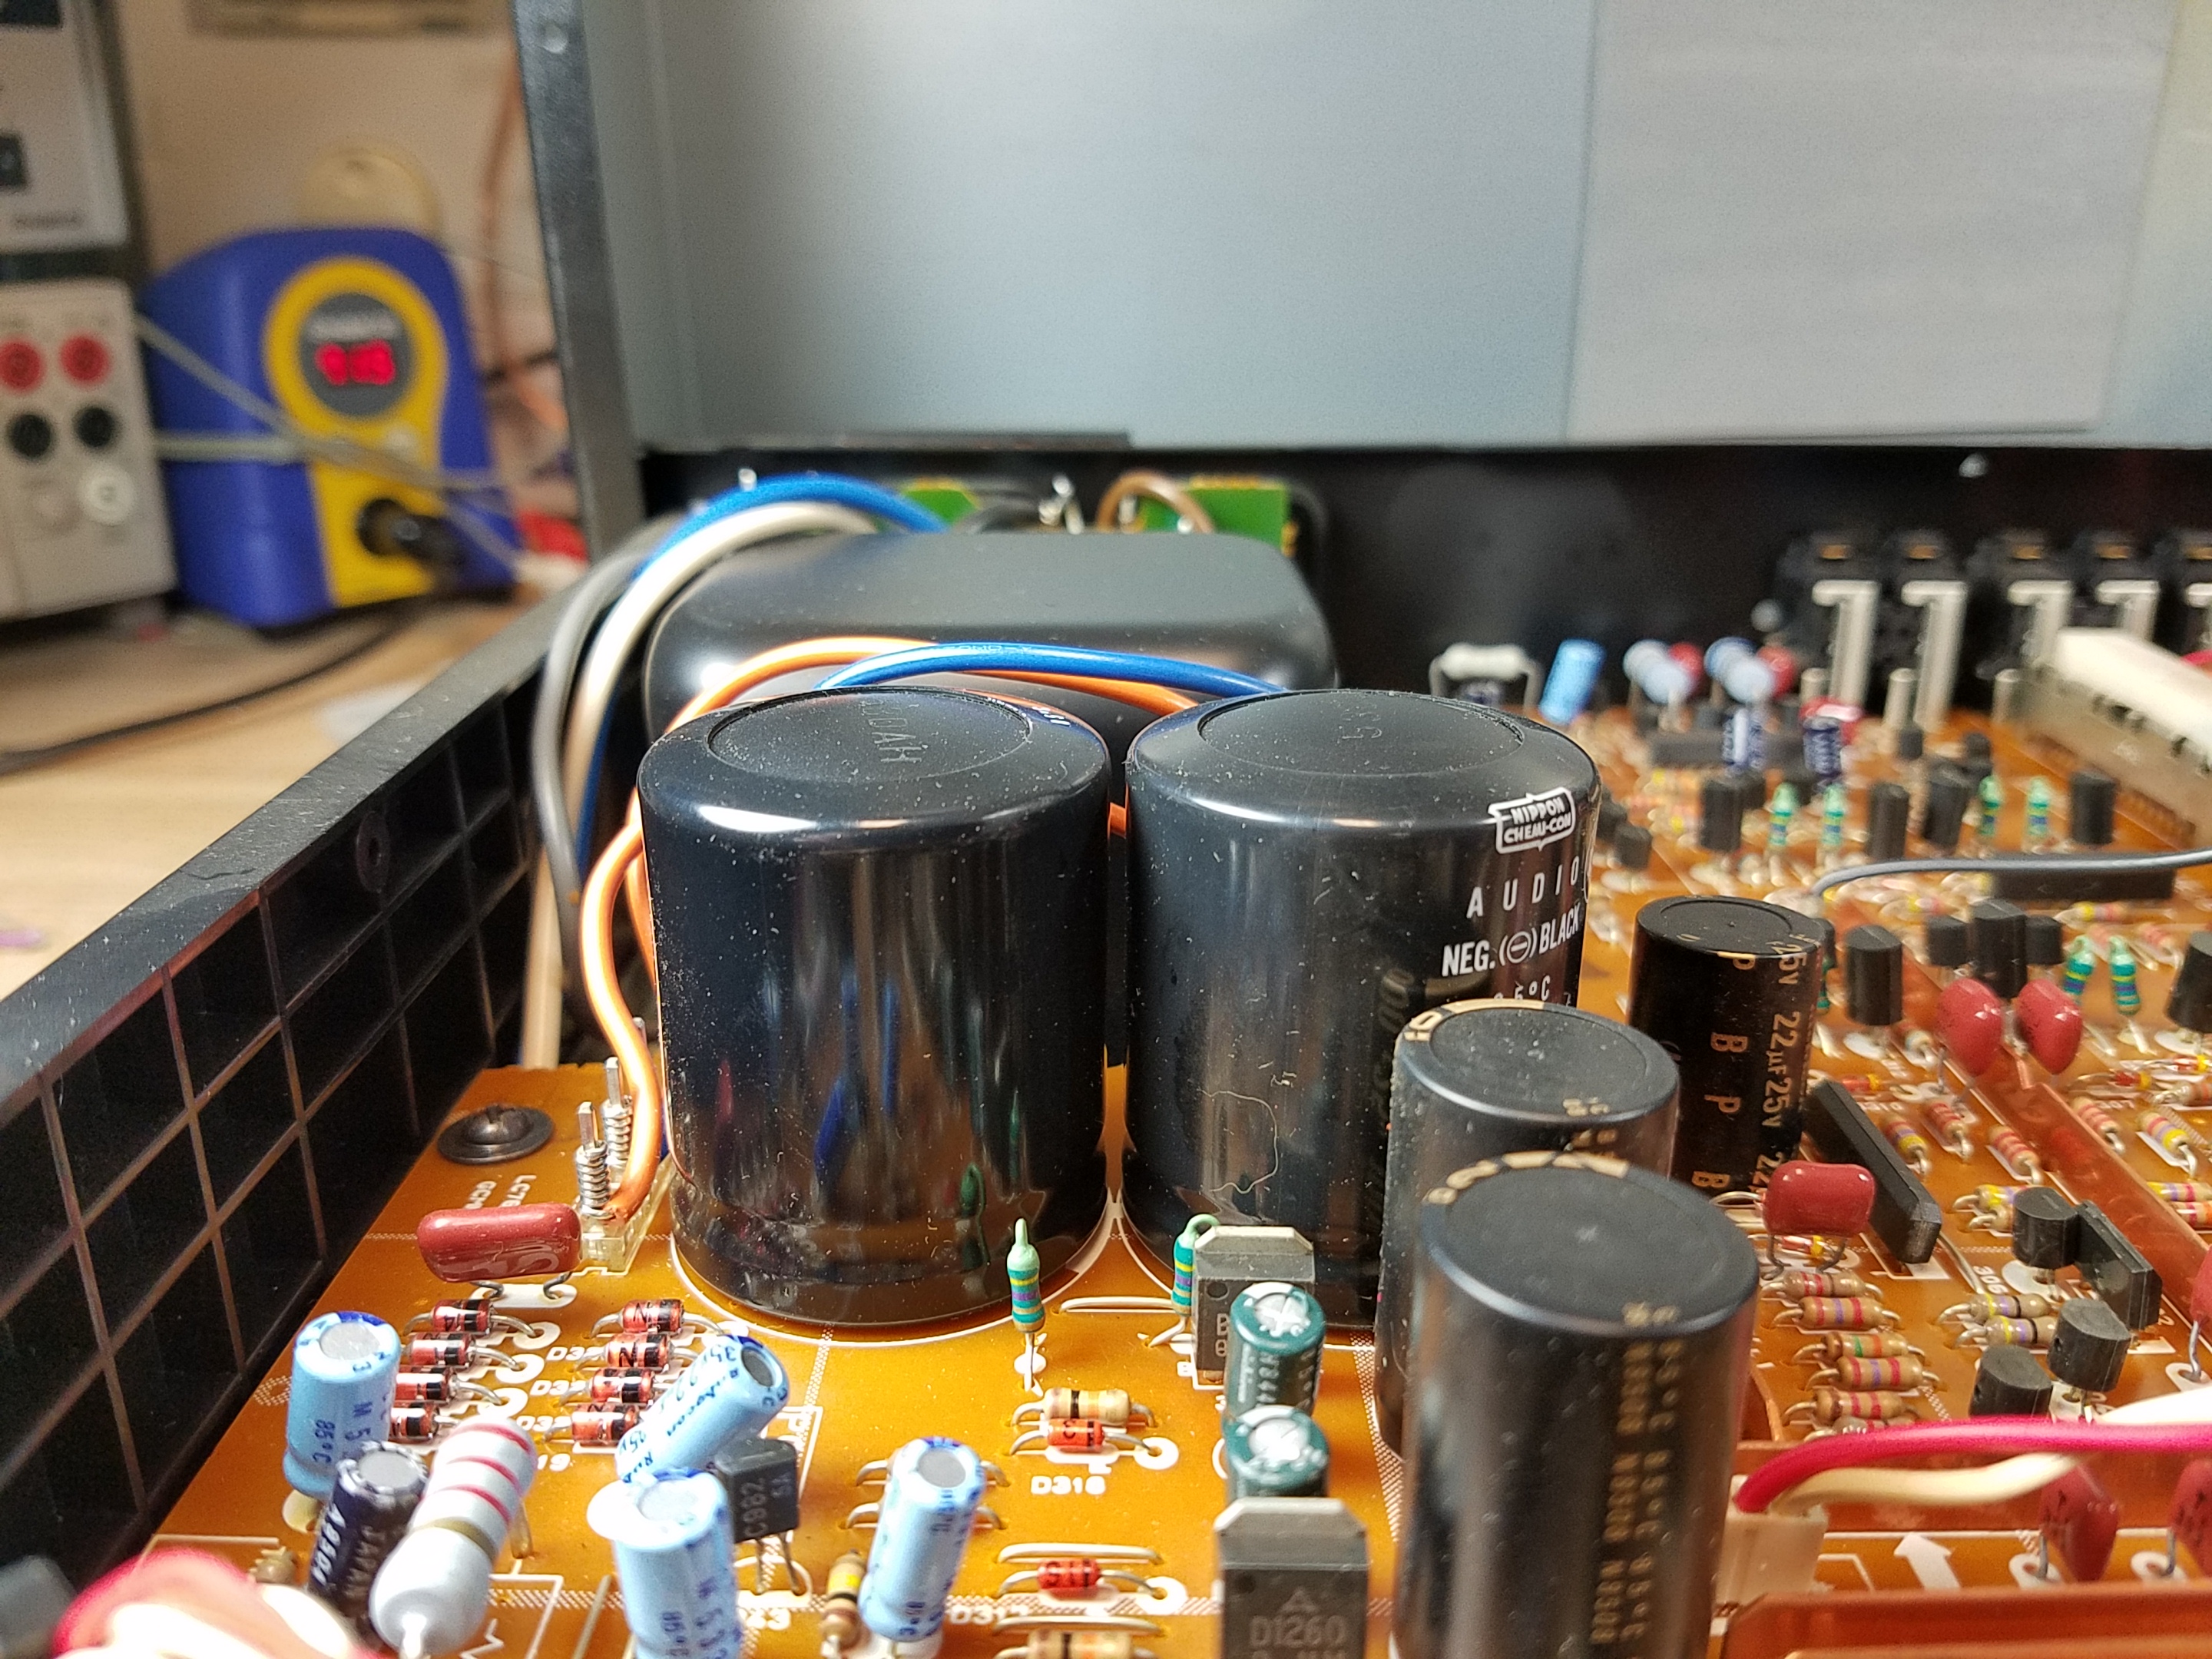
Screw Terminal Electrolytic Capacitors
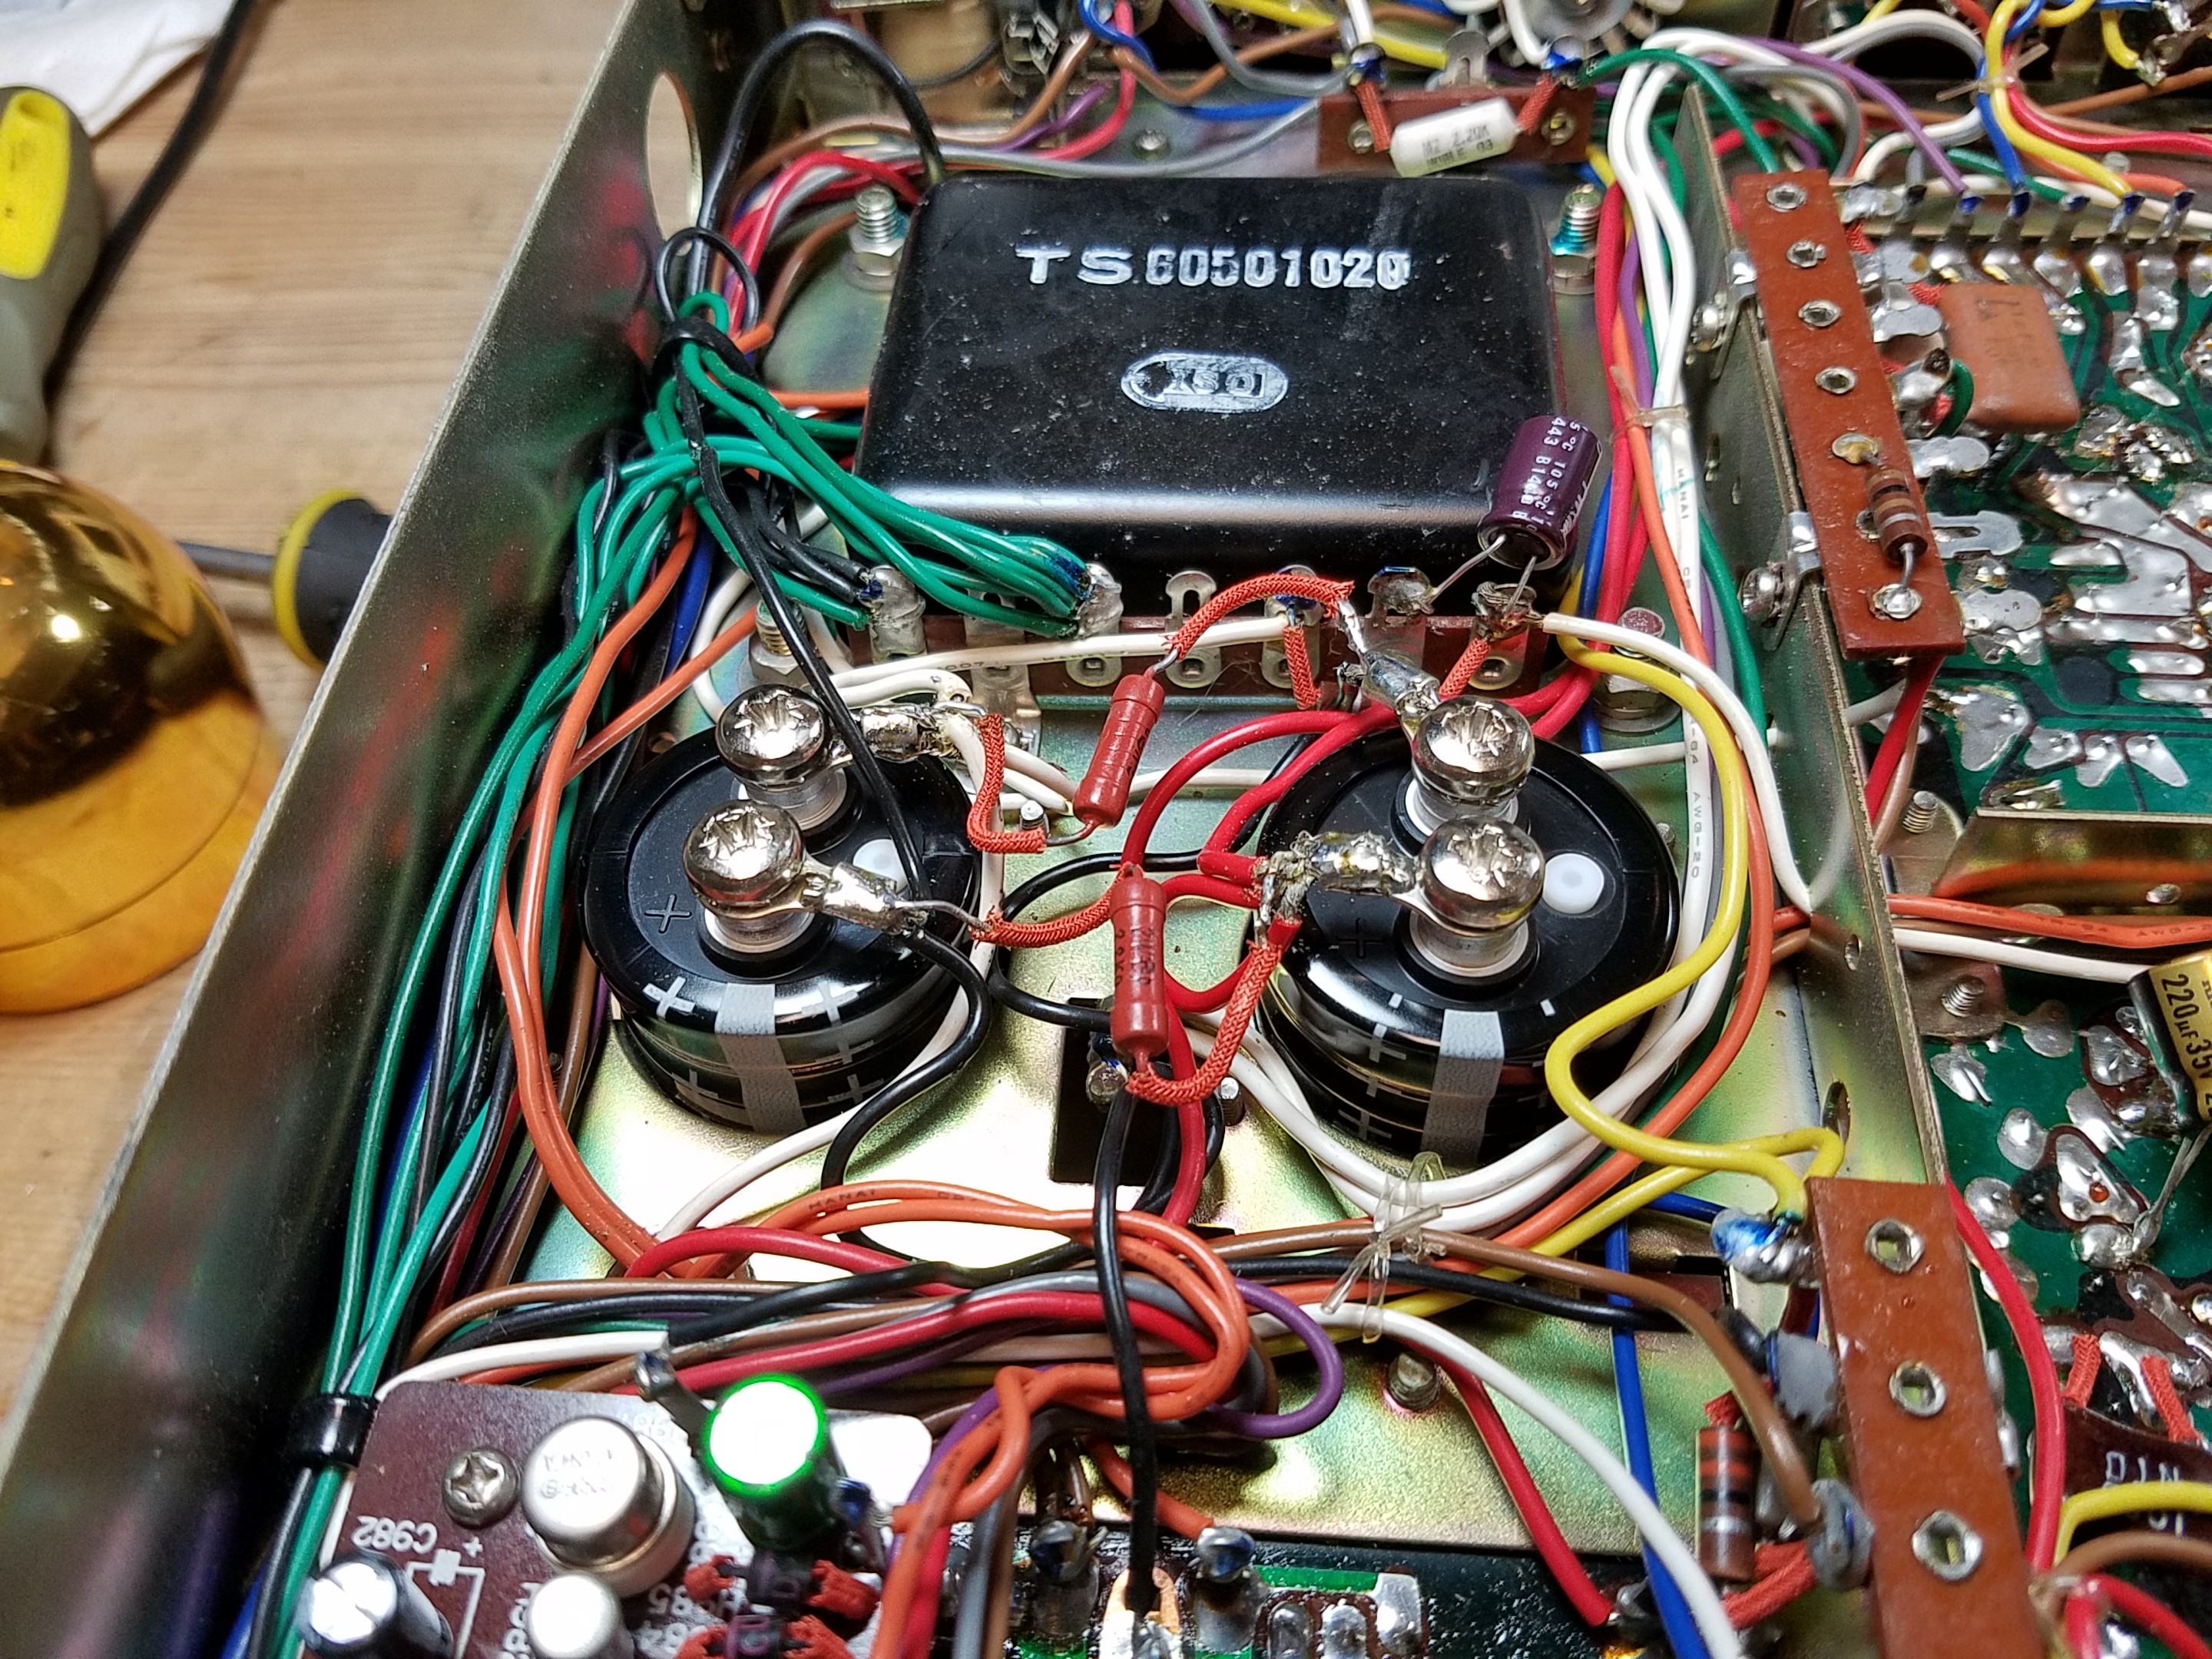
Now, for main power supply electroltic capacitors, you’re looking at stuff that’s bigger than a roll of quarters – like these two main power supply capacitors in a Marantz Model 22 which I fixed up back in 2017:
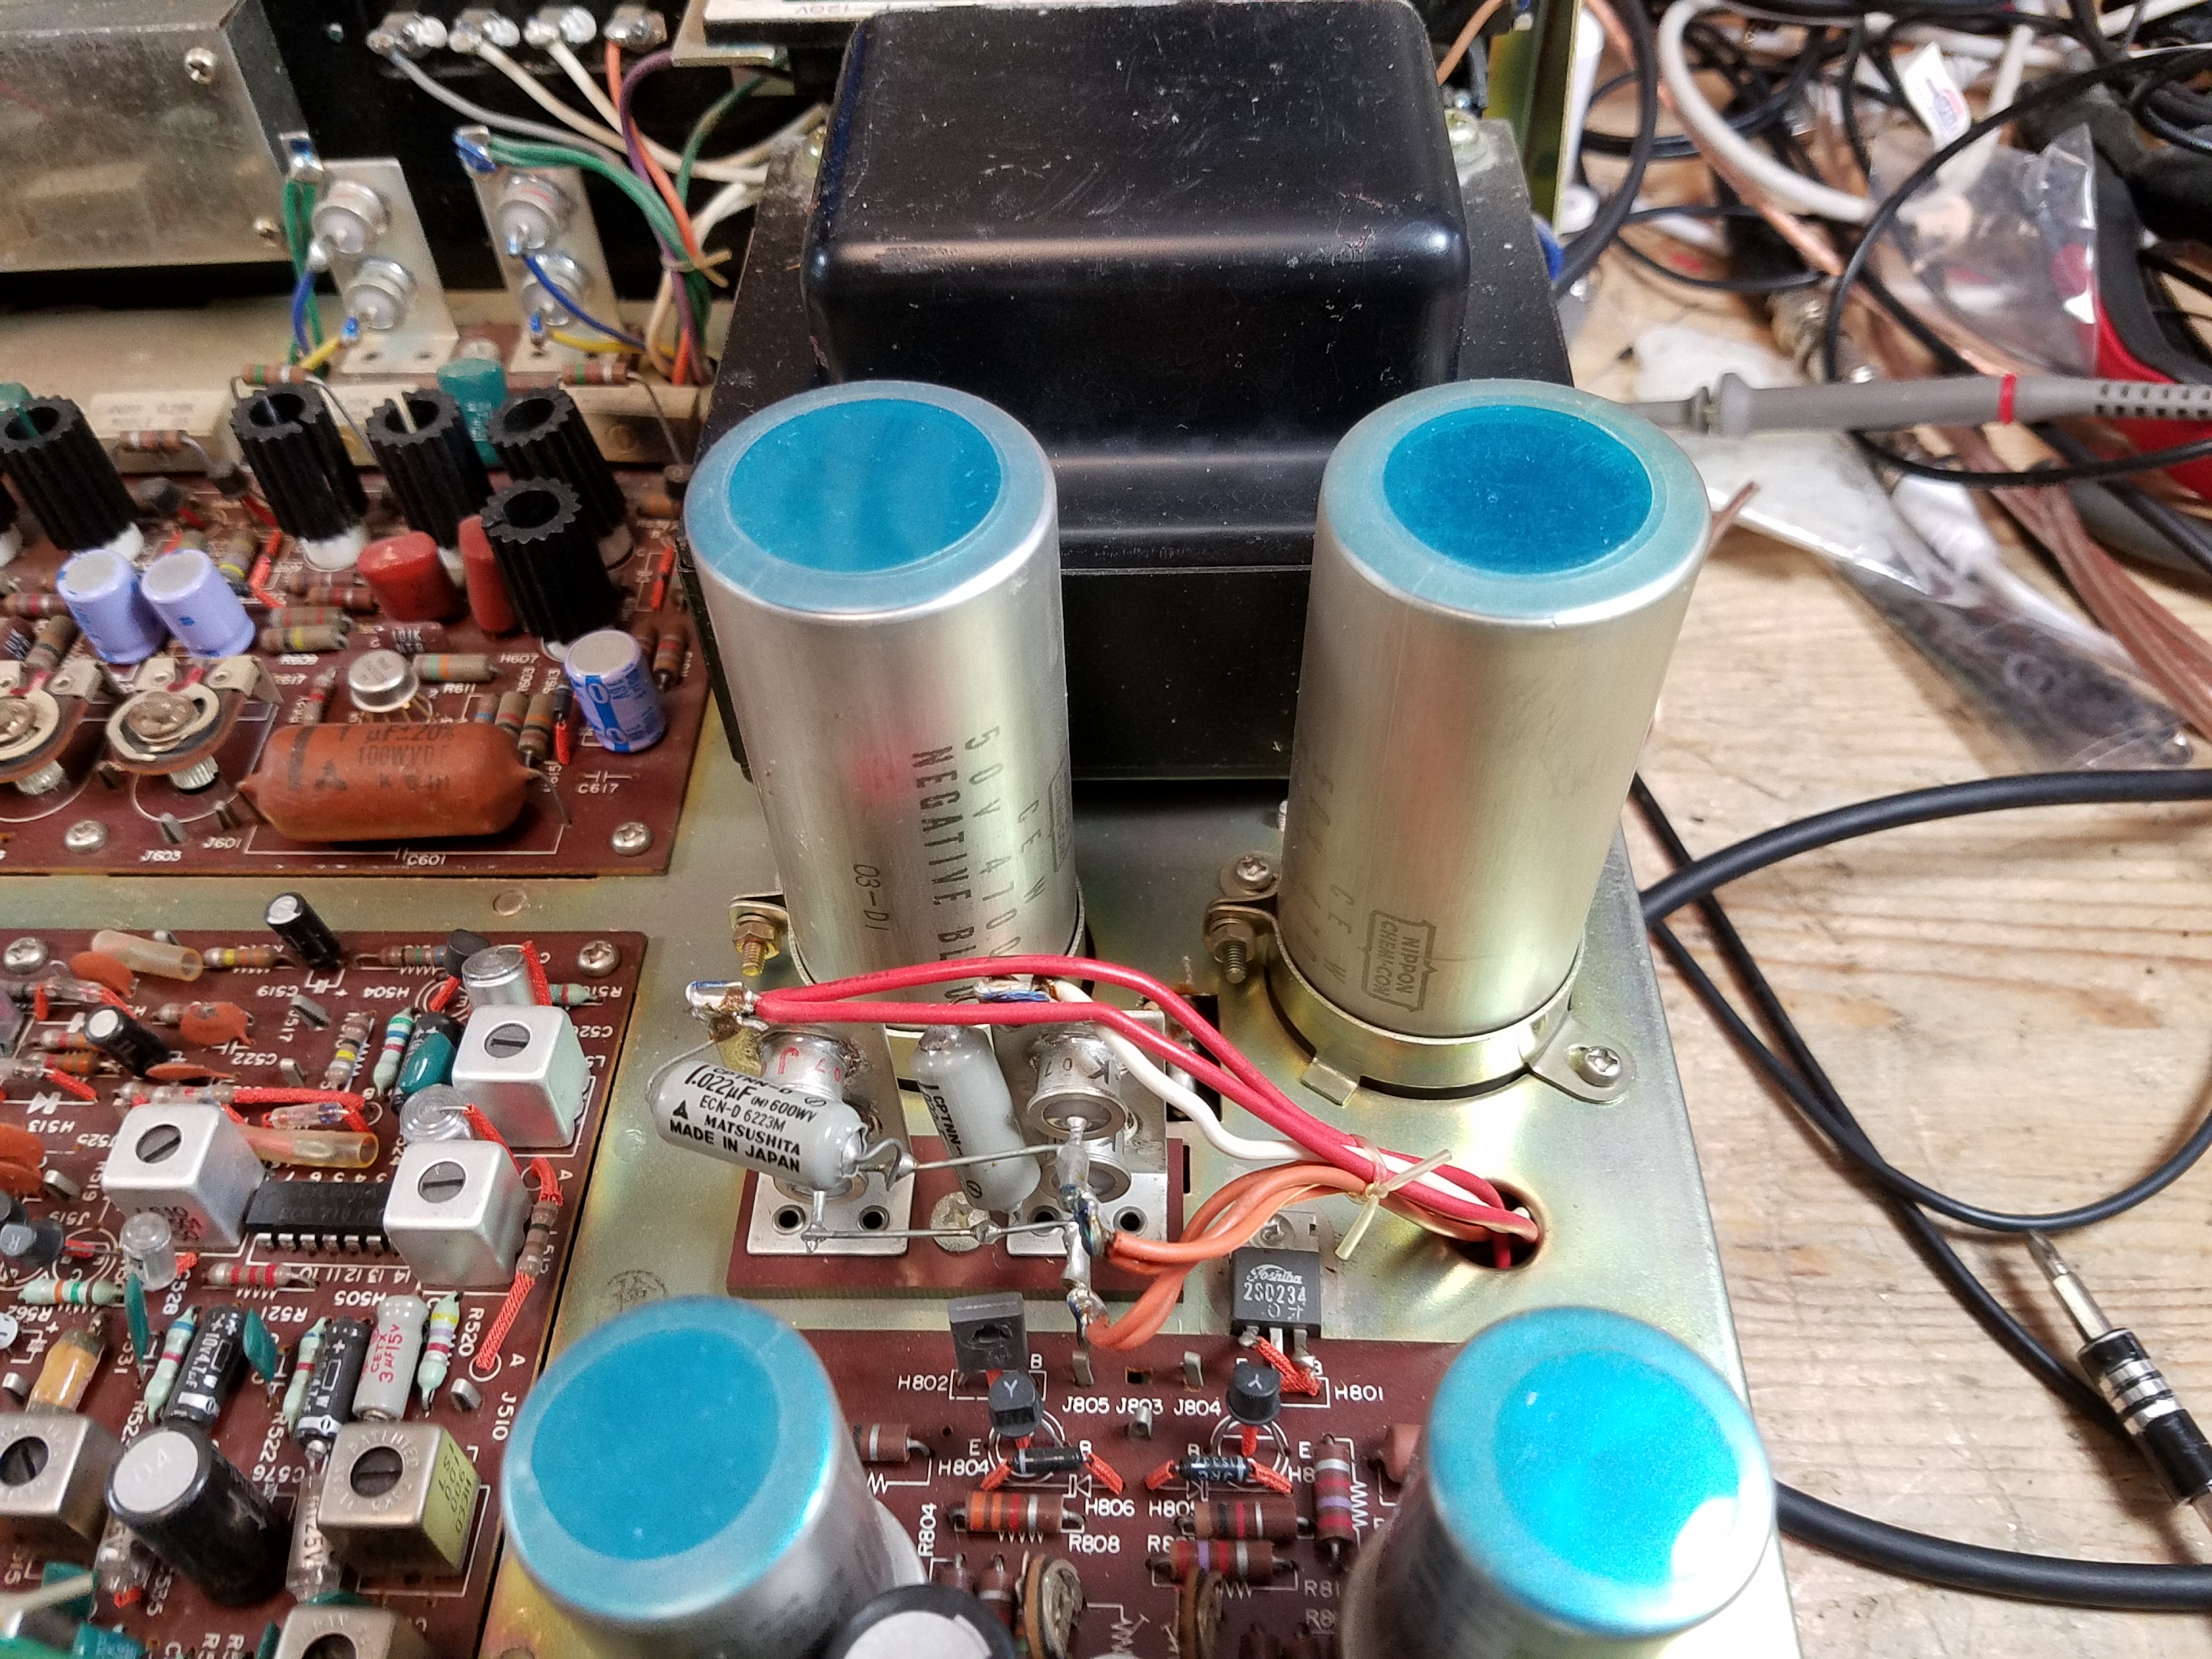
They’re clamped in on top, and have solder tabs on the bottom.

Searching for a replacement is pretty similar, but you need to pay a bit more attention to the physical dimensions. The capacitance value is typically a little more flexible here.

The main filter caps are going to be very large capacitance values. In this example: on the left, the original 4,700 uF / 50V; on the right, a modern manufacture 4,700 uF / 63V capacitor. When in doubt, as always, replace with an identical capacity value and a higher voltage. If you can’t find one at a reasonable price or the correct size, it’s usually OK to go to a higher value – up to 50% higher should never be a problem for a power supply application.
One thing to note: I recommend that, where possible, you should replace solder tab capacitors (the old style above) with screw terminals. Solder tab caps had solder points on the bottom where you’d wrap a wire through and solder it on directly much like any other component. Screw terminal capcaitors are what they sound like.
Electrically, it’s identical. But it means that (1) you can remove and replace them more easily in the future, (2) you don’t have to worry about lead spacing as much, and (3) you’re not soldering the capacitors directly so heat damage isn’t going to be a problem. Because of the number of wires and size of the terminals, you’d otherwise have to hold the soldering iron there for longer, and that’s always a risk of cooking it from heat if you go over.
Solder tab capacitors do still exist, but they’re getting pretty uncommon these days. This replacement is functionally identical, slightly safer, and future-proof.
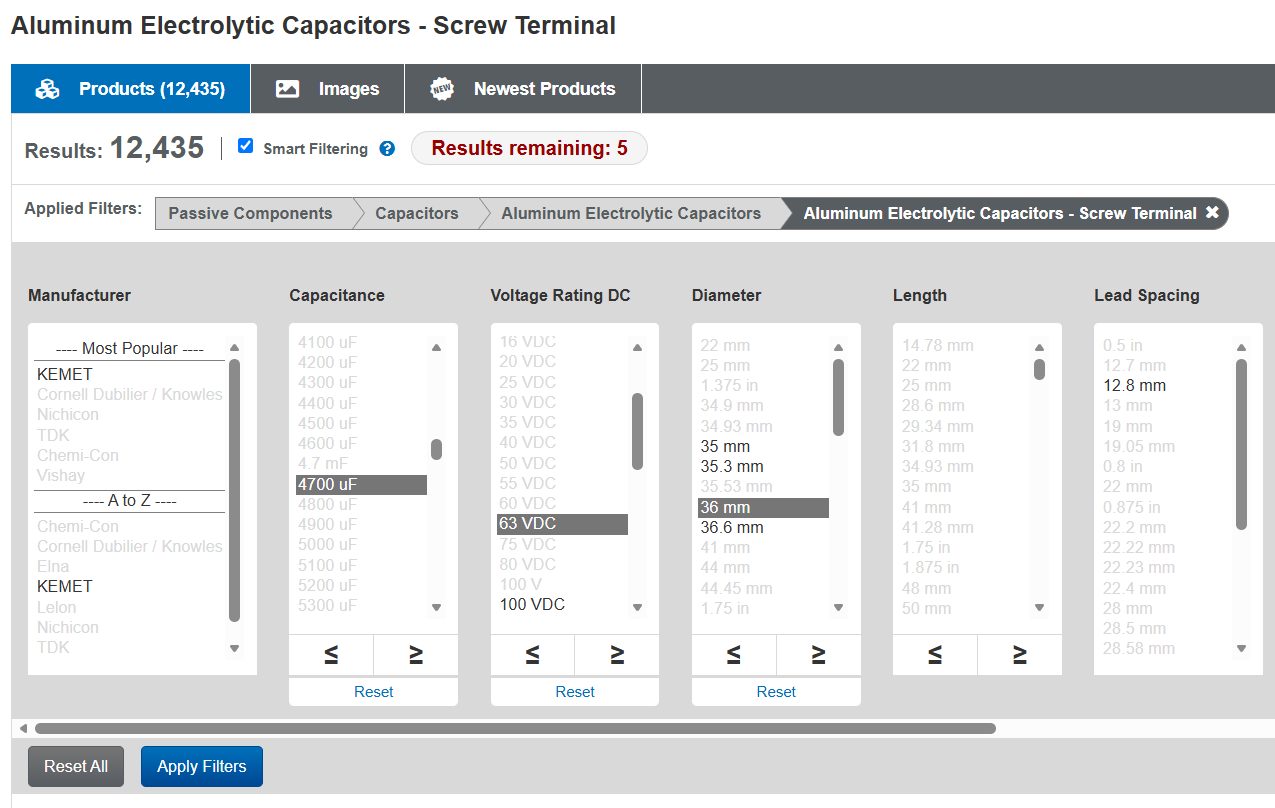
When searching for screw terminal capacitors, the physical diameter matters a lot. You need to make sure you’re pretty close to the size of the ones you’re replacing. Length doesn’t matter much, and lead spacing should be vaguely close, but the mounting clamps won’t hold it properly if it’s too small or too big. You can squeeze a few mm in either direction but that’s about it. I also typically leave the Manufacturer blank here.

Prices vary quite a bit, but clicking on the part number will give you the same info as an axial/radial capacitor. Find one which looks good to you, double-check the detail page, and add to your cart.
Snap-In Electrolytic Capacitors
Snap-ins are what you’ll find on later, PCB-era gear starting in about the ’80s:
They have the typical polarized terminals for + and – and may have several physical tabs only in addition to the electrical contacts.

For a snap-in capacitor, you need to be a bit more exacting. These are a bit more challenging to replace, especially if you’re new to the hobby.
The new component needs to have similar physical dimensions to fit in the space available – which is often a bit more constrained. In the photo above, there was only a gap of a few mm between the top of the existing caps and the case of that Yamaha C-80. You also need identical Lead Spacing between the + and – ports, and the pin arrangement needs to match. (Common schemes include 2, 3, 4, or 5 pins.) For these, if you’re not sure, you probably want to take a look at the datasheet for physical details. Here’s an example: https://www.mouser.com/datasheet/3/508/1/ALF70G102EH450.pdf

In this view, we have (D)iameter, (L)ength, Lead (S)pacing, (L)ead (Length), and (F)it which is the individuall ead size. Make sure to do careful measurements – if you know what you’re doing, you can sometimes use something like a carbide PCB drill bit to make a modification but at that point you’re doing surgery and not just a component replacement.
Some of the earliest types of snap-in caps use what we’d now consider non-standard pin arrangements. If you’re in doubt, when replacing PCB-mount snap-in capacitors, ask an expert for help. (Audiokarma forums are a good place to start, or one of the Audio Repair or Electronics Repair communities on Reddit.)
Search using the same selection boxes, but fill in more of them. Carefully measure the space you have to work with, and the old caps, then select capacitance, voltage rating, length, diameter, lead spacing, and
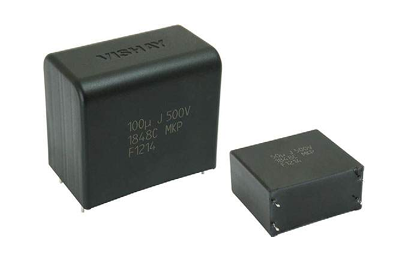
Film Capacitor Basics
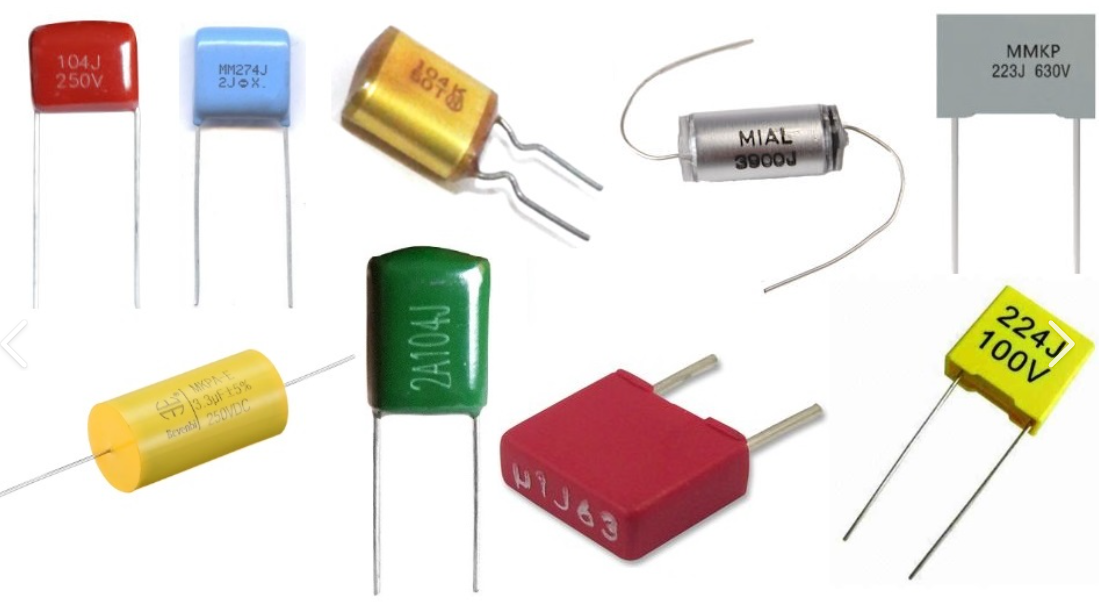
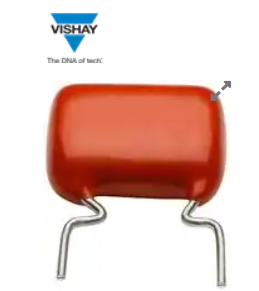
Film capacitors use a thin plastic film as the dielectric instead of an oxide layer or a ceramic material. They’re non-polarized, they have very low internal resistance and leakage, and they’re extremely stable over time because there’s no electrolyte to dry out or degrade. A film capacitor from the 1970s that hasn’t been physically damaged will still measure close to its original value and they generally don’t need to be replaced. The tradeoff is size: film capacitors are bulky compared to an electrolytic of the sme size, which is why they’re typically used in the nanofarad to low microfarad range rather than the hundreds of microfarads you’d get from an electrolytic of the same footprint.
Film capacitors show up most often in places where stability and low distortion matter more than raw capacitance. In audio equipment that means coupling capacitors in signal paths, tone stack components, and speaker crossover networks. They’re also the standard choice for snubber circuits (used to suppress voltage spikes across relay contacts and switching transistors), motor run capacitors in AC motors, and in some timing circuits – although you often see a ceramic or mica in those applications too.
In many cases, if you have the physical space for it, you can replace a polar or non-polar electrolytic capacitor with a film cap. Speaker crossovers, coupling caps, tone capacitors, etc. are good applications for this. “Back in the day” you might have seen more electrolytics here – even in tiny values like 0.47 uF – because of physical size constraints; modern film caps are build smaller and tighter than they were 50 years ago (just like electrolytics) and so you have more flexibility these days.
It’s a subject of debate whether a film cap will “sound better” than an electrolytic cap in the same circuit. In most cases, and in most equipment, the answer is probably no: the limiting factor is probably circuit design. Entry-level gear, or guitar amps that aren’t built for fine hi-fi reproduction, probably won’t benefit. Very nice, high-end hi-fi amplifiers might.
Searching for Film Capacitors

Start your search similarly as any other type of capacitor. Go to the Film Capacitors page, and then click through to the selector. Remember to check “In Stock” and “Normally Stocked” at the bottom. I typically buy WIMA, Panasonic, or Nichicon (listed in the A-Z section) capacitors, but any of the Most Popular options are going to be juts fine.
Select voltage and capacitance. Note that film capacitors do come in very tiny (pF) values, so you’ll have to scroll a bit. The two real key pieces to note are the termination style and the dielectric.
Make sure to select “axial” or “radial” for termination style. We learned about those two termination styles up earlier with electrolytic capacitors. There are a few more options here and you want to make sure you get the right one.
One thing to note with the leads: many of these come with pre-cut leads that are only a few mm long, for sticking through a circuit board and only barely poking out the other side. This is fine if the lead spacing is exact, but if you’re going to be slightly bending the leads to fit (or if you’re repairing something with point to point wiring where the leads are strung between tie points) these won’t work well. Make sure to take a look at the pictures and the datasheet to confirm.
The dielectric is also somewhat important here. The most common types you’ll encounter are polyester (often labeled PET or branded as Mylar) and polypropylene (PP). Polyester is cheaper, and it’s perfectly adequate for the majority of repair work: power supply bypassing, general filtering, motor applications, and anything where the capacitor isn’t directly in the audio signal path. Polypropylene has lower dielectric losses and a property called lower dielectric absorption, which means it releases stored charge more completely and doesn’t subtly “smear” rapidly changing signals. That makes it the preferred choice for audio coupling and crossover capacitors in anything where you care about sound quality.
If you’re restoring a piece of audio gear and you’re replacing capacitors that sit in the signal path, spending a little more on polypropylene is worth it, not because the difference is dramatic, but because it’s the right part for the job and it will outlast the equipment. (In a lot of older gear, though, they used cheap caps in every position so you might actually see some minor benefits to sound quality and accuracy here.)
Avoid a paper dielectric. These might not have the same reliability issues as older paper capacitors, but outside of boutique applications that are (in my opinion) backed more by superstition than science, they’re going to add cost and potential failure down the line compared with a PET or PP capacitor.
Filter, double-check the product detail pages, and buy as above.
Ceramic Capacitor Basics
Ceramic caps are probably the more complicated of these types of capacitors you might replace. The good thing is this shouldn’t come up very often: they’re typically the most stable, and will only be a problem if they’re either very old. From the 1960s or before, the packaging used just wasn’t as sealed or reliable as it was from the 70s onward, and this could lead to failure over time. Otherwise, though, failure is typically due to one of the same reasons a film cap might fail: either physical damage, or heat damage from something nearby – like being too close to a heat sink, or to a resistor which burns up for another reason.
Ceramic caps are complicated because ceramic capacitors come in two broad classes with very different behavior.
Class I ceramics, identified by codes like C0G or NP0, are precision parts: their capacitance stays essentially flat across temperature and voltage, they have very low losses, and they’re stable over time. They’re excellent for high-frequency bypassing, RF circuits, and timing applications where accuracy matters, and they have no meaningful drawbacks beyond the fact that they only come in small values, typically a few hundred picofarads at most.
Class II ceramics are a totally different. Codes like X7R, X5R, or Y5V indicate that the capacitor uses a high-permittivity ceramic formulation that allows much higher capacitance in a small package, but at a significant cost: the capacitance is sensitive to both temperature and applied voltage, and can drop by 20 to 80 percent under normal operating conditions depending on the grade. A 10 µF X5R capacitor rated at 10V might actually measure closer to 3 or 4 µF when 8V is across it. In audio applications, this voltage dependence is particularly problematic because it means the capacitance is changing in response to the signal itself, which introduces distortion. Class I ceramics (C0G or NP0) don’t have this problem, but they top out at small values. If you’re replacing ceramic capacitors, you should really replace like-for-like exactly as much as possible because of where they turn up.
In general, try and avoid replacing ceramic caps unless you know for a fact that it’s bad. Disc caps in older equipment are one thing, but RF circuits – especially in vintage gear – might have had dogbone or tubular ceramic caps, like these:
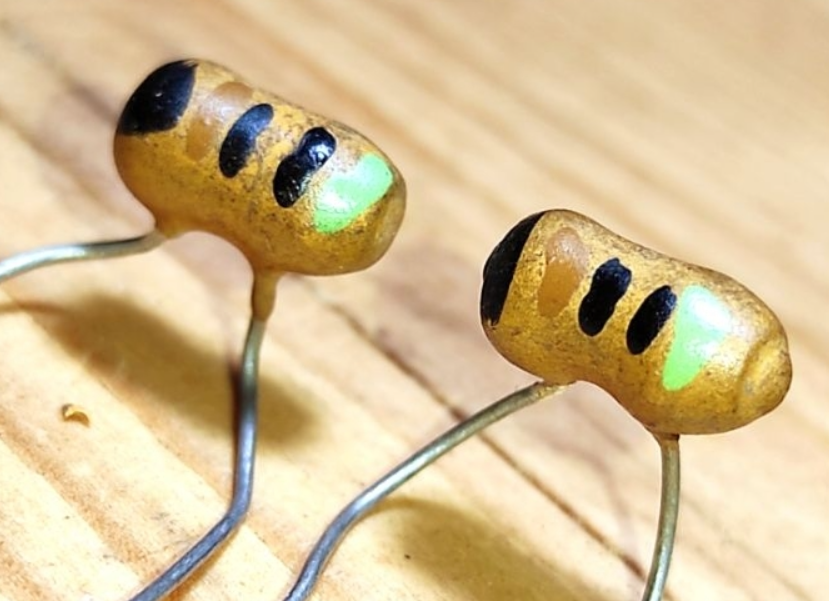
or an unusual dielectric (N750L) which is difficult if not impossible to find these days. Replace them at your own peril: you’re likely to end up with a tuned circuit which needs to be realigned at a minimum, or just drifts unpredictably it operates, leading to things like stations wandering around the dial and having difficulty tuning.

Fortunately, these are very unlikely to fail so just ignore them. Stick to doing as little as possible with ceramic caps, and unless you know exactly what you’re doing, only replace any ceramic disc capacitors and nothing else only when needed.
C0G/NP0 capacitors only come in small values. If you need something bigger for some reason, use a film capacitor.
Searching for Ceramic Capacitors
Skip any of the other options and go directly to Ceramic Disc Capacitors: https://www.mouser.com/c/passive-components/capacitors/ceramic-capacitors/ceramic-disc-capacitors/
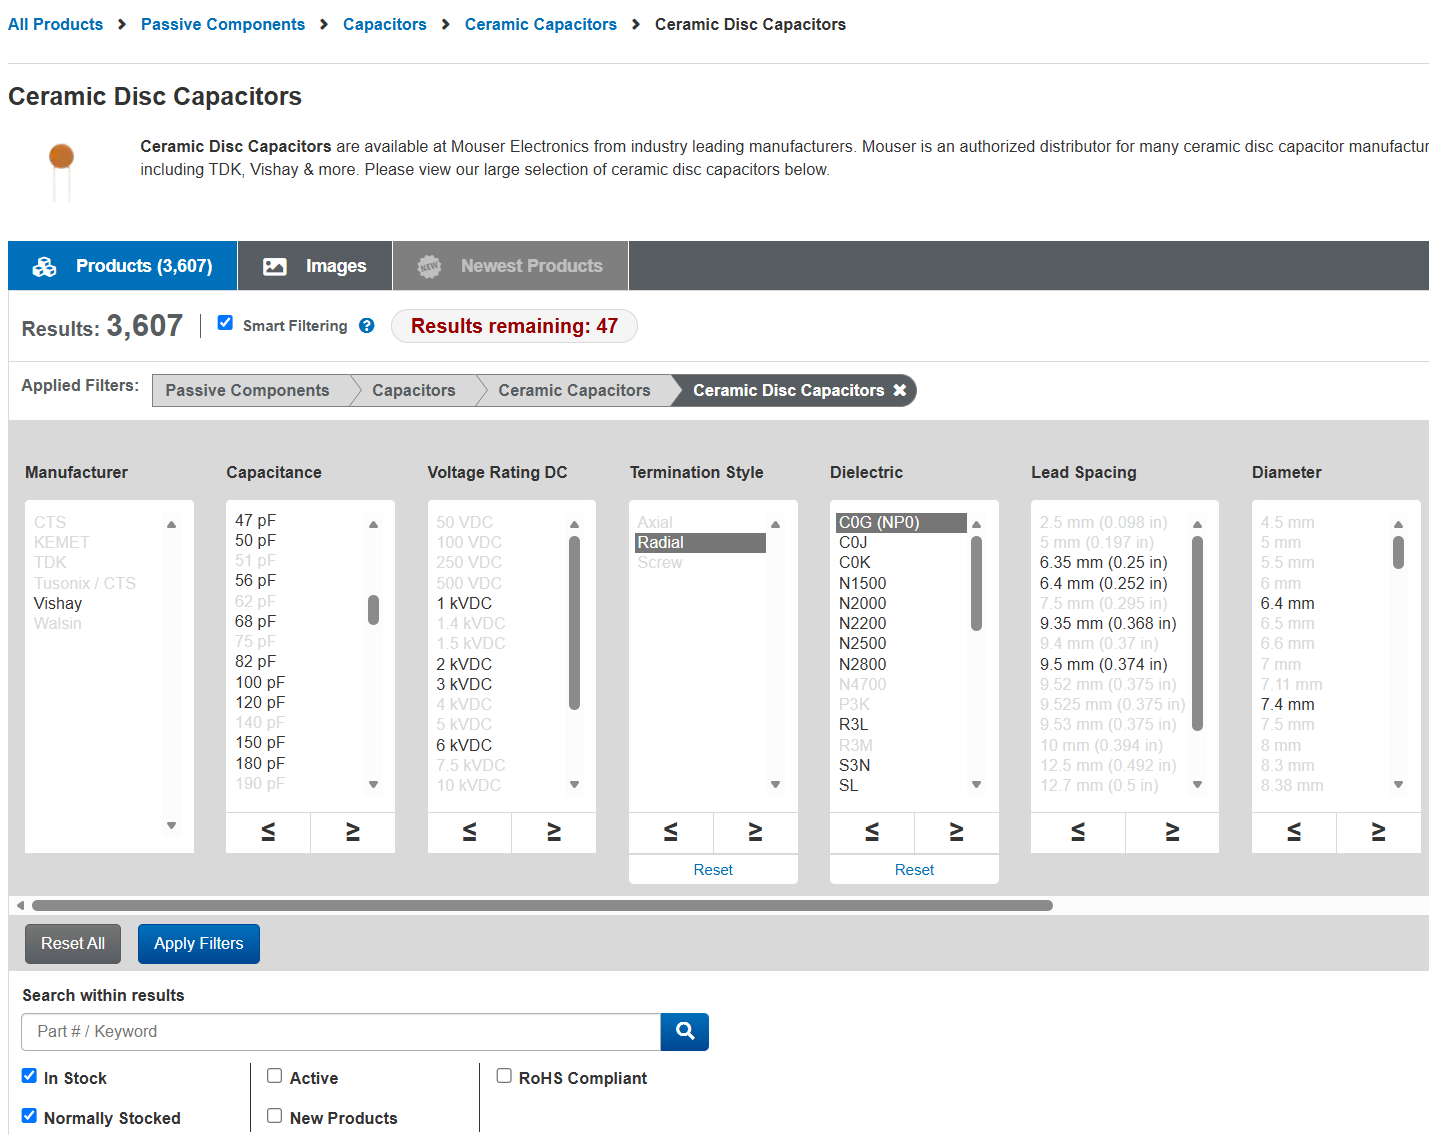
Make sure to select C0G (NP0), but otherwise just pick the right voltage rating and capacitance. Any brand will do here. Confirm by viewing the datasheet, then buy just like we’ve seen above.
Speaker Crossover Capcaitors
Speaker crossover capacitors are a bit of a special case: they’re handling a fair amount of both voltage and current, which are rapidly changing with the signal, and they’re in a sound-critical part of the signal chain.
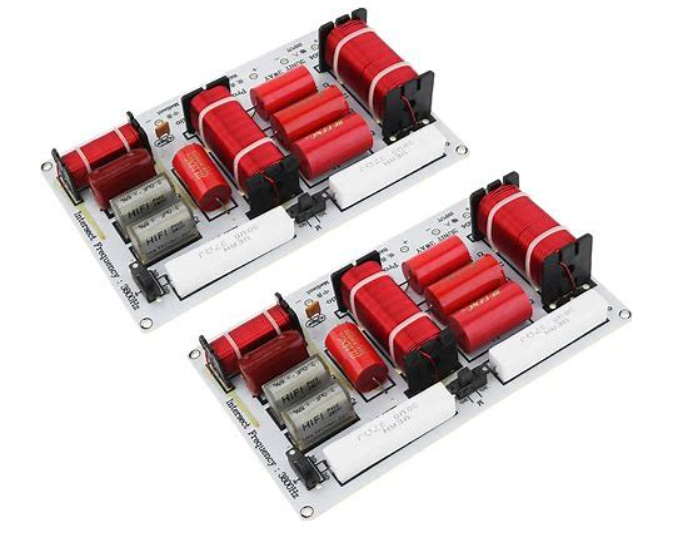
At a minimum, this means you need non-polar electrolytic capacitors. Better speakers will use film capacitors like polyester in the crossovers to route the different frequencies correctly between woofer, midrange, and tweeters (or more.)
Regardless of which type of capacitor you want to replace, I do recommend a specialized parts supplier for crossover caps, as they’ve done a lot of the research and selection work for you.
Rebuiding speaker crossovers isn’t something I’m going to get into in this article, but if you’re looking for a good place to shop, I often buy from Parts-Express (https://www.parts-express.com/speaker-components/crossover-components/crossover-capacitors) when I need something in this area.
Conclusion
I hope this has been helpful to learn how to shop on Mouser for your capacitor needs. I found that site pretty intimidating when I was first starting out in this hobby about 20 years ago, but now it’s like second nature.
Look for other articles in this series about buying other types of components soon!

Pingback: Everything to Know about Bose 901 Series I and Series II Active Equalizer Repair & Speaker Systems (and the 800, too!) | RETROVOLTAGE