I have a few projects I’m waiting to wrap up, all at about the 80% mark and all stalled out for one reason or another. This unfortunately leaves me relatively little to post about. But I was cleaning up some photos, and put together this fun photo series of how my workbench has changed over nearly 20 years through my electronics repair journey.
I don’t have any photos from way back (a backup failure ~15 years ago wiped out a bunch of my archives), but there wasn’t much to show at the time. A cheap soldering iron and a cheap meter were about all I had, and I only did some fairly simple projects. The earliest bench photos I still have around are from the end of 2009:
A variac, capacitance/resistance bridge, signal tracer, and VTVM plus a basic Radio Shack soldering station were enough to get the job done, but there were some critical gaps. The workbench was nominally temporary, but lived on an Ikea table in a spare room that was primarily for storage.
Within a couple of years I’d picked up some more gear, but was still in a temporary setup.
I kept my gear in a small closet and pulled it out when I wanted to do some work, and soldered on a makeshift stand over in the kitchen underneath the (exterior blowing) ventillation hood. A multimeter, cheap frequency counter from eBay that wasn’t especially stable but was enough for what I was doing at the time, an EICO scope and RF signal generator, and an HP audio oscillator were enough for fixing up old radios. The period gear matched mostly what I’d started on at the time. Later on I picked up a rotating chassis stand which made things a bit easier. These joined me in October 2010.
Within a couple of years, I’d moved to a new place and now had an extra room, where I set up a more permanent workbench, and added a couple of new tools which really improved the quality of life: a Rigol digital scope, Hakko soldering and de-soldering irons, and a Hakko fume extraction system – all of which I still have in service. The Hakko equipment was an eye-popping expense at the time, my first investment in real professional gear, and it was well worth it.
This is also around the time I first started doing some commercial repair work. I originally started this blog out when I was a novice and showed my journey of figuring things out as I went. A reader sent me a message. “I saw you fixed an old radio. I have that same one, can I pay you to fix mine?” I took a small number of clients, primarily local, ad-hoc for the next couple of years before making it a formal business.
Getting a bit further into it, I set up several workstations along the side of the spare room at home. Joining the bench here, far left, is an Atten dual channel 20 MHz signal generator, and an HP 16500B mainframe. I picked the HP up from a local surplus shop, and it was outfitted with a ton of oscilloscope cards – 6 x 100 MHz + 2 x 250 MHz, in fact. I used the channels so I could have eyes on up to 8 different probe points in a circuit at a time, useful while messing around with stereo amplifiers. (On the bench in this shot is a Yamaha CR-2020, which I will never work on again, thank you very much.) The user experience was pretty awkward, though, so the HP ended up getting a lot less use than I thought it might. Still not bad considering I paid $400 for it.
By the end of 2014, I’d started getting into some more complex repairs. I added an HP synthesized signal generator (which I still miss to this day), a Sencore SG80 AM/FM Stereo Analyzer for doing complex alignments, and a Sencore PA-81 Stereo Power Amplifier Analyzer which has a set of 100W dummy loads for speakers. There’s also a Keithley multimeter with THD+N measurements up top, which is where I began taking performance curves of the gear I worked on. I still have the Sencore stack, and they’re irreplaceable, although the SG-80 is the successor to the SG-165 which is plentiful on the secondary market even today.
The shop grew to the point where I didn’t want to have it in my house anymore, so I moved into a small commercial unit in late 2015. I’d picked up a few more pieces of gear along the way: isolation and step up/down transformers, a DC power supply, a couple more analog scopes, a benchtop power supply for tube gear (-150 to 0V bias supply, 6.3V heater supply, and 0-600V B+ supply), a lab signal generator, a few HP 3585A spectrum analyzers, and an HP mainframe with a few counters and generators.
The LogiMetrics AM signal generator originally came with a Nixie tube display, but it had been replaced with an aftermarket digital counter module. The HP spectrum analyzer remains to this day one of the best pieces of gear I’ve ever owned, and I regret selling when I shut the shop down during COVID. It was useful at AF as well as radio frequencies, sweeping from 20 Hz on the low end, so I could use it (plus a USB-GPIB adapter and some open-source software) to produce my first sweep plots of amplifiers.
The Tek plugin mainframe seemed like a good idea at the time, much like the HP mainframe above it, but ultimately never got much us. I did, briefly, have a second workstation set up on the other side of the room but that too fizzled.
The capstone of my bench evolution joined me in late 2015, as I added an Audio Precision System One to the stack. Founded by Tek engineers in the ’80s, Audio Precision set, and continues to set, the standard for audio test equipment. AP gear is used by chip manufacturers to characterize semiconductors from the factory, equipment companies to build their spec sheets, and similar. I still have a System One (well, two Systems One) today but not the one from this photo, which regrettably suffered a power surge some years later and failed.
The next evolution wasn’t so much gear as consolidating. I took a few things out of the stack, and brought in some better speakers – Klipsch KG4s. I also added a GPS Disciplined Oscillator to provide a master clock reference for the various pieces of gear, a higher-end RF synthesized signal generator from HP, and a few 6.5-digit benchtop voltmeters.
During COVID, for a variety of reasons, I had to make the hard decision to close up the shop, with the official last day of business being Dec. 31st, 2020. I sold off most of the gear, and put the few pieces left into storage. I couldn’t really stay away, though, and ended up pulling some things out of storage and setting up in the back of a friend’s studio space at the end of 2025.
I built a custom standing workbench that could probably double as an earthquake shelter, with the frame made of 4x4s, 2×4 fascia on the front and rear, and 3/4″ plywood for the work surface as well as an end and a divider. (Originally the area below on the left side was going to be a locking cabinet, but that proved not to be needed, so the sides just ended up serving as stiffeners.) There’s enough space, just barely, to squeeze behind and access the rear cables for all of the gear.
My initial thought was to have a left and a right workspace, so I could have two projects at once, but this ended up being poor ergonomics.
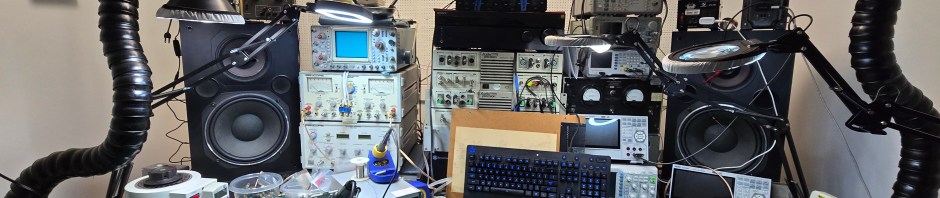
So I ultimately moved the Hakko vents to the edges, added a soldering mat surface, and picked up a few more scopes and counters to fill out what I’d been missing. The left side occasionally holds a project that’s on standby, but the main working area is to the right.
And that’s where we are today. Work is happening, but it’s all behind the scenes right now, nothing ready to show off. Hopefully that changes soon.


Retrovoltage Workbench Through The Years
I have a few projects I’m waiting to wrap up, all at about the 80% mark and all stalled out for one reason or another. This unfortunately leaves me relatively little to post about. But I was cleaning up some photos, and put together this fun photo series of how my workbench has changed over nearly 20 years through my electronics repair journey.
I don’t have any photos from way back (a backup failure ~15 years ago wiped out a bunch of my archives), but there wasn’t much to show at the time. A cheap soldering iron and a cheap meter were about all I had, and I only did some fairly simple projects. The earliest bench photos I still have around are from the end of 2009:
A variac, capacitance/resistance bridge, signal tracer, and VTVM plus a basic Radio Shack soldering station were enough to get the job done, but there were some critical gaps. The workbench was nominally temporary, but lived on an Ikea table in a spare room that was primarily for storage.
Within a couple of years I’d picked up some more gear, but was still in a temporary setup.
I kept my gear in a small closet and pulled it out when I wanted to do some work, and soldered on a makeshift stand over in the kitchen underneath the (exterior blowing) ventillation hood. A multimeter, cheap frequency counter from eBay that wasn’t especially stable but was enough for what I was doing at the time, an EICO scope and RF signal generator, and an HP audio oscillator were enough for fixing up old radios. The period gear matched mostly what I’d started on at the time. Later on I picked up a rotating chassis stand which made things a bit easier. These joined me in October 2010.
Within a couple of years, I’d moved to a new place and now had an extra room, where I set up a more permanent workbench, and added a couple of new tools which really improved the quality of life: a Rigol digital scope, Hakko soldering and de-soldering irons, and a Hakko fume extraction system – all of which I still have in service. The Hakko equipment was an eye-popping expense at the time, my first investment in real professional gear, and it was well worth it.
This is also around the time I first started doing some commercial repair work. I originally started this blog out when I was a novice and showed my journey of figuring things out as I went. A reader sent me a message. “I saw you fixed an old radio. I have that same one, can I pay you to fix mine?” I took a small number of clients, primarily local, ad-hoc for the next couple of years before making it a formal business.
Getting a bit further into it, I set up several workstations along the side of the spare room at home. Joining the bench here, far left, is an Atten dual channel 20 MHz signal generator, and an HP 16500B mainframe. I picked the HP up from a local surplus shop, and it was outfitted with a ton of oscilloscope cards – 6 x 100 MHz + 2 x 250 MHz, in fact. I used the channels so I could have eyes on up to 8 different probe points in a circuit at a time, useful while messing around with stereo amplifiers. (On the bench in this shot is a Yamaha CR-2020, which I will never work on again, thank you very much.) The user experience was pretty awkward, though, so the HP ended up getting a lot less use than I thought it might. Still not bad considering I paid $400 for it.
By the end of 2014, I’d started getting into some more complex repairs. I added an HP synthesized signal generator (which I still miss to this day), a Sencore SG80 AM/FM Stereo Analyzer for doing complex alignments, and a Sencore PA-81 Stereo Power Amplifier Analyzer which has a set of 100W dummy loads for speakers. There’s also a Keithley multimeter with THD+N measurements up top, which is where I began taking performance curves of the gear I worked on. I still have the Sencore stack, and they’re irreplaceable, although the SG-80 is the successor to the SG-165 which is plentiful on the secondary market even today.
The shop grew to the point where I didn’t want to have it in my house anymore, so I moved into a small commercial unit in late 2015. I’d picked up a few more pieces of gear along the way: isolation and step up/down transformers, a DC power supply, a couple more analog scopes, a benchtop power supply for tube gear (-150 to 0V bias supply, 6.3V heater supply, and 0-600V B+ supply), a lab signal generator, a few HP 3585A spectrum analyzers, and an HP mainframe with a few counters and generators.
The LogiMetrics AM signal generator originally came with a Nixie tube display, but it had been replaced with an aftermarket digital counter module. The HP spectrum analyzer remains to this day one of the best pieces of gear I’ve ever owned, and I regret selling when I shut the shop down during COVID. It was useful at AF as well as radio frequencies, sweeping from 20 Hz on the low end, so I could use it (plus a USB-GPIB adapter and some open-source software) to produce my first sweep plots of amplifiers.
The Tek plugin mainframe seemed like a good idea at the time, much like the HP mainframe above it, but ultimately never got much us. I did, briefly, have a second workstation set up on the other side of the room but that too fizzled.
The capstone of my bench evolution joined me in late 2015, as I added an Audio Precision System One to the stack. Founded by Tek engineers in the ’80s, Audio Precision set, and continues to set, the standard for audio test equipment. AP gear is used by chip manufacturers to characterize semiconductors from the factory, equipment companies to build their spec sheets, and similar. I still have a System One (well, two Systems One) today but not the one from this photo, which regrettably suffered a power surge some years later and failed.
The next evolution wasn’t so much gear as consolidating. I took a few things out of the stack, and brought in some better speakers – Klipsch KG4s. I also added a GPS Disciplined Oscillator to provide a master clock reference for the various pieces of gear, a higher-end RF synthesized signal generator from HP, and a few 6.5-digit benchtop voltmeters.
During COVID, for a variety of reasons, I had to make the hard decision to close up the shop, with the official last day of business being Dec. 31st, 2020. I sold off most of the gear, and put the few pieces left into storage. I couldn’t really stay away, though, and ended up pulling some things out of storage and setting up in the back of a friend’s studio space at the end of 2025.
I built a custom standing workbench that could probably double as an earthquake shelter, with the frame made of 4x4s, 2×4 fascia on the front and rear, and 3/4″ plywood for the work surface as well as an end and a divider. (Originally the area below on the left side was going to be a locking cabinet, but that proved not to be needed, so the sides just ended up serving as stiffeners.) There’s enough space, just barely, to squeeze behind and access the rear cables for all of the gear.
My initial thought was to have a left and a right workspace, so I could have two projects at once, but this ended up being poor ergonomics.
So I ultimately moved the Hakko vents to the edges, added a soldering mat surface, and picked up a few more scopes and counters to fill out what I’d been missing. The left side occasionally holds a project that’s on standby, but the main working area is to the right.
And that’s where we are today. Work is happening, but it’s all behind the scenes right now, nothing ready to show off. Hopefully that changes soon.
Share this:
Related