
A local friend is building a rat rod out of 1920s-1950s parts, a custom collection that ultimately will turn into a very fast car powered by a huge V8. He found a vintage car radio to go with it, the perfect addition and gave it to me to fix up. He requested to leave the metal cabinet alone so he could paint it to match after the car’s color scheme is finalized, so don’t worry too much about the finish.
This radio, the 4-B-31 “Roamer” was built by Firestone Tire & Rubber, the same company that today makes tires interestingly enough – they used to have a bigger product line when consumer buying habits favored combination stores. It’s a six-tube radio with a broad RF amplifier stage. Most likely the radio bolted up under a pickup truck’s dash and connected in the back to the firewall.

The tubes are 6SK7GT 6SA7GT 6SK7GT 6SQ7 6V6GT 6X5GT. The radio operates off a 6V car battery. With the low voltages it’s only about 1.2W of output power so will never be that loud, but when highways were new it was a lot quieter on the road and probably sounded better.

The battery directly powers the 6.3V filaments of the tubes, and the high voltage is provided with the help of a vibrator power supply. The 6V is fed into the electromechanical device which rapidly vibrates between two contact points turning the DC into a square-wave AC which is fed through a transformer to step the voltage up, then into a conventional rectifier power supply.

One of the pins was broken on this original vibrator, so it was the first to go. I replaced it with a solid-state replacement that uses a few transistors in a multivibrator circuit to accomplish the same effect, and should never need to be replaced again. I also replaced the 6X5 with a pair of 1N4007 diodes in an octal tube base, although this isn’t shown in any photos.
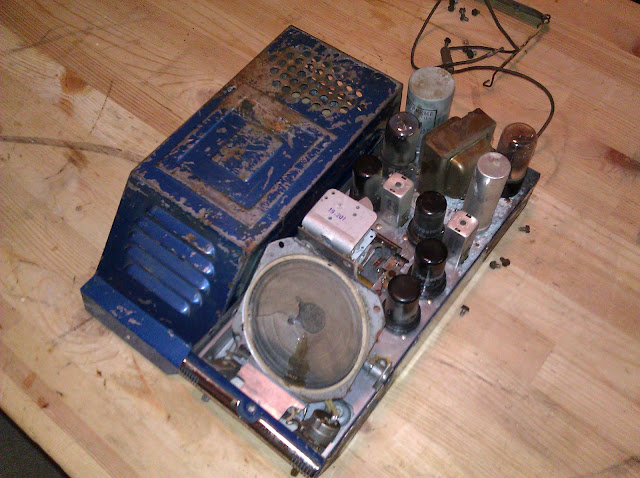
The chassis was decent to work on. It had open sides which made it easier to get things in with tight tolerances. The resistors tested decently, but all caps did need to be replaced as always. Several had blown their ends off already.


This radio was of course designed to be used in a car, and that means used with a car radio antenna which is a specific length and has certain transmission line characteristics – not quite as simple as just stringing out a long-wire. It’s a standard antenna, though, so I ordered a replacement that cost something like $10 with free shipping from Crutchfield.

It arrived in interesting packaging. The box was clearly broken in half, but both halves made it to my door without actually being connected somehow.

The antenna was in the bigger section. Go UPS?
A terminal strip in the radio was broken. This was a problem because the broken terminal happens to be the positive power lead-in and it couldn’t be salvaged. Only one terminal broke, though, so I improvised, screwing a screw lead to the mounting bracket and securing as shown, then running the wire out of the case.
Reassembled and testing with a bench power supply that was okay to check functionality. The switching power supply introduces too much hash to receive any stations, but it was good enough to do an alignment with a signal generator by injection. I then switched to a lantern battery for final tweaks which had a disappointing life of about 10 minutes. Clearly these were meant to be run off lead-acid batteries or linear power supplies only. It draws around 4A.
I also rewound the dial indicator. The dial tuning drum was still wound properly but the dial indicator string had broken so the pointer no longer moved. I used string that was a bit too thick but it worked out okay and is perfectly functional. No photos of that available though, it was pretty quick. The service manual had a full dial string diagram and pointer adjustment procedure. Unfortunately I ran into a problem as I was reassembling everything: the volume suddenly dropped off massively even with the control maxed out and it wasn’t coming back for anything. A check of the voltages showed that I had tens of volts on the screens of most all the tubes, where there was supposed to be a few hundred. I was at a loss about why this happened and finally resorted to the poke test.
The poke test is what it sounds like: poking or tapping on pretty much every part in the radio. I gave decent raps on all of the solder joints, tube pins, tie points and finally came to one that would make the volume cut back and forth: R7, the B+ dropping resistor for the screen voltages, a 15K 1W carbon resistor. Apparently it was internally cracked or otherwise defective. I replaced it with two 30K resistors in parallel to form a 15K 2W resistor, and a few others that shared the same tie point or were otherwise looking rattier than I really like even if they were in spec.

With that repair completed, the radio fired up perfectly with loud volume. This was a fun project, but power supply issues mean I don’t think I’ll take on too many of these in the future.


I have a firestone model 4-B-75 radio installed in my 1930 m0del a ford huckster. is there any working available? can mine be repaired? thanks butch p.s. it is a 6 volt 1955 vintage
It can most likely be repaired, although the specifics and cost could vary widely depending on its current condition.
I have the same radio Firestone radio 4-B-31, I would like to have it gone thought It still works ,can I get your contact information, Thanks
Pingback: 1991 Mazda Miata Air Bag Diagnostic Computer Repair & System Down Fuse Replacement [Cars!] « KF7LZE's Blog
I would like to repair a SK-19H210S that I got at savers for $7.00 The power does not come on. I cannot figure out how to get the back off. Could you let me know how to remove the back? I took out the 4 screws but would like some hints. Thanks
Pingback: March Projects « KF7LZE Radio & Technology